Saturday, June 14, 2014

Know versus Feel

Near the end of U2's song, Beautiful Day, lyrics go:

What you don't have you don't need it now.
What you don't know you can feel it somehow.
What you don't have you don't need it now, don't need it now.

I have already written about sensation versus intuition. This topic is slightly different, encompassing more of what is knowable in a position in which I was too lazy to calculate beyond certain feelings.

A couple friends and I got together to look at some games we played. One game ended with a won rook ending. I took the contrary position during the analysis and tried to prove a draw with best play, quoting Tarrasch's hyperbolic "All rook endings are drawn." A couple days later in a club match where I was leading 1.5-0.5, we reached the following position before Black's 20th move after an exchange of bishops on c2. I'm playing Black.


Black to move

Material is equal at 7 pawns and 2 rooks apiece. Black's pawns are more advanced on the queenside; White's a little more advanced on the kingside. White has the better center with the stonewall-like d- and f-pawns against the backward e6 pawn. I came up with a plan to attack White's d-pawn with the c5 advance, but I wanted to prepare c5 with moves such as a5-a4 and/or Kc8-c7-b6 so that white doesn't get a protected passer after c5 dxc5 {moves} b4. Much of my time on this move was spent trying to make c5 work and also trying to figure out if I needed to redeploy my rooks to the e-file in preparation for e6-e5. The problem with putting the first rook on e8 is that White could use the pin and try f4-f5. Eventually, I decided that I would double on the d-file, put my king on b6, and then advance c5 when White would probably capture dxc5 with check and then Kxc5 as long as there isn't a white pawn on b4. Once White's d-pawn is gone, then I can try to advance e6-e5. The game continued 20...Rd8. I overlooked my opponent's plans, but this didn't hurt me too much. 21.a4!?.


Black to move

Now I started to calculate what happens among the a-, b-, and c-pawns. I didn't like the fact that if I allowed axb5, I'd probably have to recapture cxb5 and then I might never remove the backwardness of the e6 pawn. If I advanced 21...b4, then 22.cxb4 axb4 23.b3 gives White a protected passed a-pawn. The third alternative was 21...bxa4 allows White's rook to enter my position with 22.Ra1 and possibilities of Rxa4xa5-a7, but I figured I have time to make trouble with 22...c5, capture on d4, maybe land a protected rook on d2 with check, and further maybe capture Rxg2. I could see that White could bail out of the rampaging rooks variation with an eventual Rxd4 in which case I would probably have to capture twice on d4 and lose the e6 pawn, but it was weak anyway, so why not give it up? So I chose this last plan. 21...bxa4 22.Ra1 c5 23.Rxa4 cxd4.


White to move

Fritz prefers 24.Rxa5 dxc3= for White versus White's choice in the game. White chose 24.Rc4+. Is is better to go Kd7 or Kb7? Kd7 looked very unattractive because it temporarily undoubles my rooks, preventing them from putting enough pressure on d4 to win a pawn. The main benefit is to protect the weak pawn at e6. If 24...Kd7 25.cxd4, I'm stuck with a backward e6 pawn again. But Fritz prefers this and concludes that 25...Rd5 favors Black by about a half a pawn. White has two isolani (b2, d4) while Black has one isolani (a5) and one backward pawn (e6). I dodged 24...Kb7 25.Rxd4 Rxd4 26.cxd4 Rxd4 27.Rxe6


Black to move

Now that my weak e6 pawn is gone, I relaxed and began to think that a draw was almost in hand. "All rook endings are drawn." I have a decision to give up my g7 pawn for his f4 pawn or defend g7 with a passive rook placement like 26...Rd7. Would I rather have the passive rook and a symmetrical pawn position or an active rook but with fractured f- and h-pawns? I chose the latter because I felt that my pawn on a5 was probably going to get surrounded if I became too passive. 27...Rxf4 28.Re7+


Black to move

A subtle point. Should Black put his pawn on b6 or c6? Fritz likes c6 by a few hundredths of a pawn. Consolidating weaknesses is one principle I try to follow. It saves a tempo if White plays Ra7, but Black would get the tempo back after Kb6 forces the rook to either back up to a8 or move off the a-file. Kc6 is slightly more central and flexible. One major disadvantage of Kb6 that I failed to appreciate is that White can indirectly defend his b2 pawn as we'll see later. 28...Kb6 29.Rxg7


Black to move

At this point in the game, I think I lost concentration. Time control was no real factor. My opponent and I each had about 40 minutes to make 1-2 moves and then we would have an hour after that. I had gotten to a rook ending with equal material. And "All rook endings are drawn." was fresh on my mind. I had threats of pinning White's king and pawns back with Rf2+. I had the slightly better king at b6 and more advanced pawns, especially a5. An aggressive line would be 28...a4 29.Kc3 (to avoid the pawn-forking Rf2+) h5 30.Rg8 h4 and White has almost no play except checking the Black king. Instead of thinking of how I could press, I felt it was time for some mindless consolidation. 29...Rf5? 30.h4 (taking advantage of Rf5?) h5 31.g3


Black to move

Thanks to my mindless play, White now has the possibility of sacrificing g3-g4 to spring the h4 pawn in a queening race. Since White's king ends up more centralized, the g-pawn is much less of a threat than the distant h-pawn. Again from the position above, I played mindlessly. 31...Kb5 32.Kc3


Black to move

In isolation, 31...Kb5 turned out to not be a dubious move, even though it gives White skewering possibilities. 31...Kc5 would have been more centralized. I forgot that the a5 pawn was still protected laterally by Rf5 as long as the rook doesn't get kicked by White's king coming to e4. An aggressive continuation I didn't even think about is 32...Rf3+ 33.Kd4 Ka4 34.Ke4 Rb3 35.Kf5 Rxb2 36.Kxf6 Rg2. But 31...Kb5 combined with the game continuation helped me lose several tempi. 32...a4?! 33.Kd4


Black to move

Because I didn't choose 31...Kc5, White's king is now aggressively centralized at d4. Because I chose 31...Kb5, a plan to attack the newly vulnerable b2 pawn with 33...Rf2 34.Ke3 Rxb2?? runs into 35.Rb7+. Because I chose 32...a4, Ka4 is not available for me to hide from a skewer. Still, 33...Rf2 is the best continuation as the Black Rook can just play tag with the White King without capturing the b2 pawn. e.g. 33...Rf2 34.Ke3 Rg2 35.Kf3 Rd2, perhaps intending Kc4 and Rxb2. Instead, I meekly avoided the skewer with 33...Kb6. Only that didn't work because White put the skewer back on the table with 34.Rg8 Rf2 35.Ke3 Rf5 36.Ke4 Rf2 37.Rh8 Ra8 38.Ra8+ Kb5 39.Rh8


Black to move

If I were looking for a draw, I should have played the repetition 39...Ka6, but I thought that Ka6 was inferior to Kc6 because if I had intended to capture Rxb2, I have to respond to Ra8+ with Kb7 dropping the a-pawn instead of allowing Rb8+ skewering to my rook at b2. But because I had done the analysis on move 33 with White's king on d4, I didn't consider that my king could now go to c4 and then b3. Ka2 appeared in some of my fantasy variations, but it's bad because of Rb4 and if the rooks come off, White's sacrifice g3-g4 wins (my move 29 comes back to haunt me). If Black tries to prevent g4 in this Ka2 line, e.g. 39...Kc4 40.Rc8+ Kb3 41.Rb8+ Ka2?? 42.Rb4 f5+ 43.Ke5 Rf3 44.Rxa4+ Kxb2 45.Rf4 Rxg3 and White still has a tablebase win. Another subtle point about rook endgames is that 39...f5+ 40.Ke3 is not so good for Black because now his pawns can be quickly gobbled by the White rook. Slowing the pawn slaughter by keeping pawns two rook moves apart is useful when time is a factor. 39...Kc6 40.Rxa5 Rxb2


White to move

Here I had fantasies of winning. I predicted 41.Ra5 Rb4+ and if 42.Kf5?? then Rb5+ starts a pawn race where I queen first. With help from Fritz, I see now that Black should come out of it with one extra pawn 43.Rxb5 Kxb5 44.h5 a3 45.h6 a2 46.h7 a1=Q 47.h8=Q Qe5+ 48.Kg6 Qxg3+ 49.Kf7 (49.Kxf6?? Qc3+ skewers) Qc7+ 50.Kg6 Qc2+ 51.Kf7 f5 with a tablebase draw. Also, it seems pretty clear that 41.Ra5 Rb4+ 42.Kf3 Kb6 43.Ra8 Kb7 44.Ra5 Kb6 is drawing. But my opponent's move here surprised me. 41.Rf5! The exclam is not so much because it's winning, but that it keeps winning chances alive for White. Notice that Rxf5+ gains a tempo because my king is not on c4. After 41.Rf5, I noticed that my a-pawn just needs some precise blocking and he could go all the way. One idea that came to me was to try to get White's king to interfere with the White rook's defense of the queening square. so I played 41...Rb4+ 42.Kf3 (it's blocking Rf1!) a3 43.Rxf6+ Kb5 44.Rf8

Diagram A

Black to move

There are about four ways to go from this diagram which I have labeled Diagram A. One easily draws. One possibly wins. One draws with difficulty. One obviously loses. My only excuse for choosing the obvious loss is that the ups and downs of draws and wins were getting to me. I still had plenty of time. I still felt that I had a draw even though White had connected passers and I was down a pawn. I even thought if White were imprecise, I could win. But the more I calculated, the more I knew that I couldn't queen the a-pawn. The disappointment of failing to queen created enough emotion that my decision making was far from objective.

The Easy Draw: From Diagram A: 44...Ra4 then 45.Rb8+ Kc4 46.Rb1 a2 47.Ra1 leaves the White rook passive.

Diagram B

Black to move

If White never moves his rook, the a-pawn will never queen. Black keeps his rook on the a-file. Black can draw by either 47...Kc3 48.h5 Kb2 49.Rh1 a1=Q 50.Rxa1 Rxa1 or more easily with 47...Kd5. If the White king comes over to b2 to capture a2, Black should be able to knock out one or both of White's kingside pawns. The activity of the Black rook checking laterally from the a-file should be enough to draw easily. However, I didn't calculate deep enough to know that having White's rook trapped on a1 was enough to draw.

The Possible Win: From Diagram A: 44...a2! 45.Rb8+! Kc4 46.Ra8 Kb3 47.Rxa2 Kxa2.
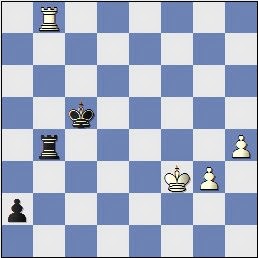
Diagram C

White to move

Now from Diagram B, with White to move, Fritz likes Black by two whole pawns, but the Shredder online tablebase says this is a draw. However, false steps from White can lead to a win for Black. Some techniques to know for Black are that having the rook on White's fourth rank is good. If a pawn tries to run offside to the sixth rank, the rook can run down a lone pawn. e.g. 48.h5 Kb3 49.h6?? Ra6 50.h7 Rh6. Having the rook on the fourth helps prevent the White king assisting in the pawns' advance. In order for White to have winning chances, he needs to get both pawns to the sixth. From Diagram B, that requires 5 tempi during which time, Black's King could have walked from h2 to f7 or f6. With Black king and Black rook watching over the queeening squares, even two pawns on the sixth would probably lose, assuming White's king is on f3. If it doesn't make sense to leave the Black rook on b4, the maneuver Rb4-Rb1-Rg1/Rh1 is also valuable. Another Tarrasch quote is "Always put the rook behind the pawn.... Except when it is incorrect to do so." The Black king would like to blockade the pawns from their front, but one of the drawing variations involved the Black king helping the rook capture a pawn from behind.

The Difficult Draw: In analyzing Diagram A, I figured I could force White's rook off the board, but I would be two tempi behind Diagram A. I didn't realize I could capture his rook on a2 because of the overlooked threat of Ra4 after Kb3. What so strange is that back in Diagram A, I recognized the threat of Ra4, but I couldn't see the same threat if I moved my king Kb5-c4-b3 or Kb5-a4-b3. I felt that my king would have to advance to b2 before I could queen the pawn at a1 and then the rook would sac for the queen: 44...a2 45.Rb8+ Kc4 46.Ra8 Kb3 47.g4?? Kb2?? 48.h5?? a1=Q?? (48...Rb3+ 49.Kf4 Ra3 still wins for Black) 49.Rxa1 Kxa1.

Diagram D

White to move

Diagram D is a tablebase win for White beginning with 50.h6! This is what I feared when I chose the worst continuation and overlooked my chances in the first two variations.

The Obvious Loss that I chose: From Diagram A, 44...a2! 45.Rb8!+ My opponent pretended to move 45.Ra8 before releasing the rook on b8. He knew Ra8 was losing and was just messing with me. 45.Ra8?? loses to 45...Ra4 and the pawn does queen despite efforts to get back to the first rank such as 46.Rb8+ Ka5 47.Ra8+ Kb4 48.Rb8+ Ka3!. The losing move was 45...Kc5??

The Losing Blunder

White to move

It's incomprehensible that I thought I could defend against the connected passers. I had this lame feeling that White would allow me to blockade the pawns and grab one or that I had the opportunity to distract White by queening the a-pawn and then grabbing one of his pawns. To his credit, my opponent steadily advances without giving me this chance. With threats of mate, I had to give up the a-pawn for nothing. Here's the complete game for play-through.

What I don't have now is a one-point lead in the match. It's tied at 1.5-1.5. I have White next and could still win, but I could also lose the next game and the match. This game paralleled somewhat our first encounter when he drifted through a drawish endgame and lost. In summary:

  • Not all rook endings are drawn.
  • Don't feel your way through rook endings. Know them through actual calculation.
  • Beware of superficial analysis. (29...Rf5?, missing that 39...Kc4 was available, missing that 47.Rxa2 is forced after 46...Kb3.)
  • One rook beats two pawns if they are not advanced. (Diagram B versus Diagram C)
  • Watch the lines where kings and rooks are treading. (Black's 31...Kb5, 33...Kb6, and 38...Kb5. White's 42.Kf3.

Monday, June 2, 2014

Suicide Queens

I worked through some tactics recently and noticed a group of tactics having a similar theme. When queens of both sides are in danger, not necessarily about to capture each other, it pays to look at in-between moves where your queen sacrifices itself for a piece, instead of preserving your queen or capturing your opponent's queen. Although I've given away the key idea, try to work through these three diagrams in your usual systematic or haphazard way and decide which move is the strongest. The first two are possible positions from openings I study and the third is Chess Tempo #76859.

Diagram 1: White to play and find the best move

Diagram 2: White to play and win

Diagram 3: Black to play and win

The solutions are as follow:

  • Diagram 1: 1.Qxg6 - There isn't a great amount of advantage between this and simply 1.Bxd8, but Qxg6 is still the highest rated move
  • Diagram 2: 1.Qxc6+ Nxc6 2.Bxb3 - The rook is more tempting, but the knight comes off with check.
  • Diagram 3: 1...d6+ 2.Bc2 Qxf4! - A hard move to find in the middle of complications. If Black tries 2...Be4, 3.fxe3 removes Black's biggest advantage.

It's important if you're playing an in-between move, make sure that your opponent doesn't have a similar in-between move. In Diagram 1, notice that 1.Qxg6 protects the assassin bishop on f6 and Black has no checks. In Diagram 2, 1.Qxc6+ captures with check and limits Black's choices. In Diagram 3, the desperado queen playing 2...Qxf4 doesn't capture with check, allowing Black to check with 3.Bf5+, but Black would just capture 3...Qxf5. White's poor queen doesn't have any checks or in-between captures except for the measly pawn.

Saturday, May 31, 2014

Falsification

As a scientifically minded person, I sometimes struggle against magical thinking that my mind clings to in its obsessive paths. I admit to some superstition to bring me good luck. My routine included:

  1. Wearing my light gray fleece sweater if I'm due to play white
  2. Wearing my dark gray fleece sweater if I'm due to play black
  3. Wearing my black Merrell loafers
  4. Writing on top of my lucky book
  5. Drinking water from my lucky blue Wild Island cup
  6. Using my lucky pen

Facing an important game last Thursday, I procrastinated doing my preparation until the last day. On the way to the game and with the ersatz devil-may-care attitude of a man who thinks he's over his head, I scrapped all but the last two superstitions and showed up. Instead of a fleece sweater, I wore a ketchup stained T-shirt. Instead of loafers, I wore Teva sandals. To my surprise, I had incredible luck. My opponent not only walked into my favorite chess trap, but at the crucial moment, he overlooked the one move that makes my trap work and zigged when he should have zagged.

Popular news reported the results of a 2004 research paper by Cowley and Byrne proposing to expose the reason how a strong chess player does what he does. The key word was falsification. Like scientists, chess players form hypotheses about where to search for the best move and what that move will look like. Chess calculation is the testing of that hypothesis and the falsification occurs when the player figures out "Wait, that won't work. Better try another line/hypothesis." Rejection of an erroneous hypothesis in chess is synonymous with avoiding weak moves and blunders. And luck in chess happens when your best line sits inside your opponent's blind spot.

I'm not completely free of my magical thinking and superstition, but I think I have partially falsified the hypothesis that my chess accoutrements have anything to do with my chess results. It's a pity that my game contains enough of my "secret sauce" such that I'm reluctant to share it. I believe that if someone found my blog and linked it to my identity, future opponents could study my repertoire and figure out its weaknesses. Perhaps that is another hypothesis that needs to be falsified.

Wednesday, May 28, 2014

Colorful Tactics

During some tactical study, I came across some patterns that have unusual features that probably defy generalization, but they seem to tell a small story that could be summarized in a colorful name.

Here's the first tactical problem:

This is Chess Tempo #64813. White has already sacrificed a queen, but the c-pawn is about to queen. The solution eluded me, probably because the setup for the discovered check is so tempting 1.Rxa7+ Kxa7 2.Rb8+ Rxe3 3.Rxc8. White is still winning after either 3...Re1+ 4.Kh2 Ne6 5.Rxh8 Nxc7 OR 3...Rxd3 4.Ra8+! Kxa8 5.c8=Q+. But queening with check and checkmate is the correct path, even if it means sacrificing both rooks. 1.Rb8+! Qxb8 2.Rxa7+! Qxa7 3.c8=Q+ Qb8 4.Qa6 Qa7 5.Qxa7#. Replaying this combination with heavy piece action almost seems like White is pummeling the Black King in the corner of a boxing ring with a five-punch combination. The best name I could find was this five-move combination from the Street Fighter video games, Balrog's Super Crazy Buffalo.

The second tactical problem is also from Chess Tempo:

This is Chess Tempo #91491. Both sides are threatening each other's knights with advanced queens. White's knight has no safe fleeing squares, so it can only be bolstered by a defender. Black's knight can both flee and be defended. The key finding in this position is to see that despite the number of empty squares around the White Queen, almost none are safe, only Qa1. Black can defend and attack at the same time with 1...Rb7! If White uses his move to protect Ne2, then 2...Ra8 wins queen for rook. If he pulls his queen to safety, then 2...Qxe2 wins. I named this problem Agoraphobic Queen to remind myself to look for trapped pieces, even seemingly out in the open. You could also name this one Claustrophobic Knight for White's terrible e2 knight.

The third tactical problem arises from a game a friend played recently. After Black's 21st move:

My friend playing White had an overwhelming position that can be solved tactically, but he missed the strongest continuation and played positionally, but won anyway. The best line was not spotted by White nor by myself and another friend trying to figure it out. White can land his rook on the eighth rank with 1.Bxf7+ Rxf7 2.Re8+ Rf8, but after that we tried bolstering with 3.Rad1 and 3.Nxd6, but the strongest is 3.Re7 and Black is helpless to stop mate. This implies that the final objective of Bxf7 was to land the rook on the seventh rank after bouncing it off the eighth rank. My friend called this maneuver the Bounce Back. This tactic is likely the most practical of the three colorful tactical patterns above.

Monday, May 19, 2014

Vader versus Kenobi

As two of his final steps toward the Dark Side of the Force, Anakin Skywalker killed Count Dooku in a duel and helped Darth Sidious kill Mace Windu. Darth Sidious bestowed upon Anakin Skywalker the new title of Darth Vader. But his next epic struggle, an 8-minute duel with Obi-Wan Kenobi did not go as smoothly as with Dooku and Windu.

The 1993 Illinois Open was probably the best tournament of my life. I had just crossed into Class A for the first time prior to the tournament, rated 1832. In round 1, I defeated Erik Karklins, rated 2141. In round 2, I defeated Kevin Bachler, rated 2234. But in round 3, I faced the highest rated player of my entire chess career, Erik's son Andrew Karklins, rated 2413. It's strange to see my play from 21 years ago. My faint recollection was that I just tried to defend everything as best I could. Computers weren't very strong back then, but when I check my game over with Fritz, it seems that through luck and grit, I was able to withstand all he threw at me for the first 25 moves in an offbeat Sicilian with 3.Bb5+ Bd7 4.Bc4. Karklins eventually played 7.c3 and 9.d4, but his big center didn't seem to become too dangerous for me. On the 26th move, I could have even offered a queen trade in an advantageous endgame, but my endgame was very weak back then. Then on move 29, he went for a dubious exchange sacrifice to get at my king. The evaluations stay equal until move 35 when I could have gotten a winning advantage from this position:

Unfortunately, I chose wrongly on move 35 to lose the win. Five moves later, I had this position:

My sense was that I had the advantage because of my advanced e-pawn. I just needed to hide my king from the White Queen's checks. Overconfident, I failed to appreciate that the checks could lead to the White Queen capturing e3 for a winning endgame.

VADER: This is the end for you, my master.
KENOBI: It's over Anakin. I have the high ground.
VADER: You underestimate my power.
KENOBI: Don't try it. [Vader vaults over Kenobi's head, but Kenobi cuts off Vader's left hand. Vader catches fire from the nearby lava. Kenobi walks away.]

After this defeat, I lost to an expert in round 4 and beat an expert in round 5. For my 3.0/5, I won $37.50, but my performance rating was 2279. Andrew Karklins went on to share first place with 4 others at 4.5/5.

In the intervening 21 years, I moved away from the Chicago area, reached expert rating in 2004, and struggled for the last decade with often disliking chess for teasing with false hope of my ever reaching master. Karklins seems to have spent almost a decade near the upper 2300s and lower 2400s before drifting down over the last 13 years and finally hitting a 2200 rating floor last year.

We were paired in round 3 of the 2014 Larry Evans Memorial.

According to this site, about 19 years elapses between Star Wars Episode III and Episode IV, when Vader and Kenobi have their rematch.

VADER: I have been waiting for you, Obi-Wan. We meet again at last. You should not have come back. The circle is now complete. When I left you I was but the learner. Now I am the master.
KENOBI: Only a master of evil, Darth.
VADER: Your powers are weak, old man.
KENOBI: You can't win, Darth. Strike me down and I will become more powerful than you can possibly imagine.

Prior to the game, another master, Viktors Pupols saw our pairing and said, "If you are an e4 player, I know what your opening is going to be. But I'm not going to tell you." I doubt that he had our opening in mind when he said that.

Even though the game was short, I feel that the early shock of the opening gave me momentum to cruise through the middlegame, doing little more than securing my king, pressuring the center, and challenging whatever blockader showed up at e6. Except for the move 22.e6, I didn't feel like I did anything fancy and I felt surprised and relieved when he resigned. The last time I beat a master was 9 years ago. After this game, I scored 0.5 in three games, finishing at 2.5/6. Karklins became more powerful after I defeated him, scoring 2.5 in three games and finishing at 3.5/6.

Saturday, May 17, 2014

Rocky II

Rocky II suffers as many sequels do from the dilemma of giving the audience more of the same success or trying to surprise them with risky new material. Rocky goes through a rather mundane existence of becoming less and less successful again, living extravagantly, and losing his income streams. Act 1 is Rocky becoming a sympathetic loser again. Act 2 is Adrian falling into a coma - a rather weak part as it seems a third of the movie is devoted to waiting at her bedside. Act 3 is the Main Event: The Rematch with the memorable finish of both boxers going down, but only Rocky getting up in time for the count.

Like my favorite part in the first movie, in Rocky II, Rocky has self-doubt again, but it's confined to a short conversation between rounds:

Rocky: That guy is great.
Mickey: No, no. Listen, he's only a man. You can beat him because you're a tank, kid. You're a greasy, fast, 200-pound Italian tank. Go through him! Run over him!
Rocky: I'm a tank. I'm gonna get him.

One mustn't think of one's adversary as being flawless, or else you have already lost the battle of morale. The Larry Evans Memorial opened my eyes to the flaws of my superiors. Not that I thought that all the experts and masters that I've ever played were flawless calculating machines, but I thought that my error rate was so much more frequent that they were essentially perfect against me. I remember now they make mistakes too. Even grandmasters make blunders. I can at moments find my way through the thicket and emerge with the advantage. Then it is a matter of discipline to find the path of technique and cash in.

Rocky 3 and 4 seem like mostly revenge matches, one against Clubber Lang who causes Mickey's heart attack, and one against Ivan Drago, who kills Rocky's friend Apollo Creed in the ring. One more short vignette from Rocky IV:
Duke: [to Rocky] You see? You see? He's not a machine, he's a man, he's a man.
Drago: [to his own trainer] He's not human. He's like a piece of iron.

In my only game against our local youth phenom, I didn't feel outmatched. I even had the advantage for much of the early middlegame. But I threw away much of what I had earned early in the game until I had to struggle to hold a draw. Even into the endgame, I was struggling. Hoping for a knockout, my opponent traded material for time, only to find out that he now had to struggle for a draw. And then he blundered and allowed me to convert a book draw to a win. The Shredder tablebase indicates that in the rook pawn queen ending, it was a theoretical draw all the time until he failed to centralize his queen on move 88. Then he blundered on move 91. This was my second longest game ever. I went the distance, beat a former club champion, and broke my 3.5-year drought of wins against 2000+ rated players.

I will be facing the kid again in the club championship semifinals. I have to maintain morale, look for my chances, and run him over with excellent tank-nique.

Monday, May 5, 2014

Queen to Play

Queen to Play is a 2009 movie about a cleaning lady whose humble middle-aged life is transformed by her discovering she has a passion and a talent for chess. Set on the beautiful island of Corsica, the drudgery and isolation of Hélène, played by Sandrine Bonnaire, seem more pronounced among the tourists and the wealthy American expatriate widower, Dr. Kröger, played by Kevin Kline. Hélène has a husband, a daughter, and a small group of friends, but they seem too caught up in their own lives to notice how Hélène is changing, except to the extent that her chess lessons with Dr. Kröger resemble an affair. It seems to have been Caroline Bottaro's directorial debut. It found me on Netflix.

I really enjoyed this movie, especially how they get chess obsession right, without going too far into dysfunctional mental pathology like Nabokov's The Defense. Hélène stays up late into the wee hours of the morning sparring with her chess computer and begins to see chess in a checkered patio at work, on the tablecloth while dining, and even on her sink tiles while she brushes her teeth. In a subtle and sophisticated way that would be hard for chess illiterate viewers to understand, the movie captures the fun and passion of chess. The best part is the dialog between Hélène and Kröger which rings true with my chess struggles. There's even a cameo by Jennifer Beals as a mysterious earthly woman, but who could also be interpreted as Caissa herself.

Normally, I dislike foreign films since I feel something important is getting lost in the translation, but I much prefer subtitles to voice dubbing since the voice tone conveys so much of the actor's emotion. I am especially prejudiced against French films since the crazy ending of The Hairdresser's Husband gave me the impression that French artistic choices are too outlandish. But chess obsession being a cross-cultural language perhaps made the film even more charming than an American production could have been for me. The original title of the movie in French was Joueuse (joo-EZ) meaning female player. I now know that the French work for chess, échecs, is pronounced AY-shek, and checkmate or échec et mat, is pronounced SHEK-y-mot in French. I transcribed a bunch of the dialog, but in the end it would totally spoil the movie, so here are a couple of the less spoilery quotes.

Kröger: Rules are less important than exceptions in chess. Breaking rules at a timely moment, that's what you have to do. Do you understand?
Hélène: Not really, no.
Kröger: [chuckles] Neither do I.

Kröger: You ask too many questions. It's only a game. So play. Be yourself and enjoy it.