
I should go back and watch "The Count of Monte Cristo" because much of it fades from memory. I guess the gist is a grave injustice leading to prolonged imprisonment followed by escape and revenge. My header refers to "The Shawshank Redemption" which includes a line of dialog discussing "The Count." Both Shawshank and Count are about prison breaks. In this phase, the black king finally breaks free of back rank imprisonment.
This post is the fourth installment from a semifinal game from my 2015 club championship run. The game is broken into phases running roughly in reverse chronological order.
- Practical Rook Endgames 09 is the final phase of the game.
- Practical Rook Endgames 10 is the penultimate phase of the game.
- Practical Rook Endgames 11 is the third to last phase of the game.
For this fourth installment, I'm going 13 moves into the past from the previous post to the moment the game became a single rook versus single rook ending.

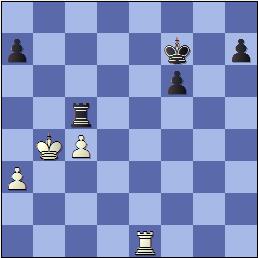
In rook endgames, I often think of the rooks as monsters rampaging around and eating up peasants as fast as they can with the possibility that one side will end up with a decisive advantage in pawn quantity. These considerations of capturing speed often deal with how orderly the pawns are and whether it pays in tempi to attack or defend. The game continued along this line with 38.Kb3 Rxf2 39.Rxc5 Rxh2 40.Re5.

Black has gotten the material superiority, but White has several positional advantages: his rook cuts off the black king, his own white king has space to roam, and the c-pawn is the most threatening passer on the board. Incidentally, Stockfish at 30 ply sees a draw ahead. Maintaining activity of the pieces is important with all phases of the game and the ending is no exception. The rooks are weird in that they command as many squares from the edge of the board as from the center and in fact checking distance seems to make them want to lurk at the edge of the board. However, my opponent has utilized a cutoff idea which prevents my king from fighting White's passer. Here I made a decent move designed to disrupt the rook placement, but I missed two other ideas that are crucial to the position.
The first missed idea is that Black might try to sneak the h-pawn past an en passant attack. The distant passer is a strong asset and if the opponent respects it too much, the position could transform into another kind of advantage for Black. 40...h5!?.

Of course, one of the problems with this move is that White's threat of queening the c-pawn is stronger, especially when Black's king has back rank issues right now. Still drawish is 41.c5 Rh1 42.Kc2 Rh4 43.Kc3 Rh1 44.Kc2 and Black can draw by threatening to arrive at c1 or c4. This drawing idea by trying to enter on c1 or c4 is the second idea that would have been helpful to see. But the two ideas are nearly mutually exclusive. If Black got too cocky about the h-pawn, 44...h4? would be a mistake because it would prevent the threat of Rh1-Rh4-Rc4 stopping White's passer. But if White were to make the mistake of 41.gxh6 then Black does well to recapture 41...Rxh6, with plans to transfer both king and rook to fight the c-pawn and if White's threats can be neutralized there, the f-g connected passers will be very strong eventually. One of the advantages of h5 is that if White tries to oppose rooks, Black probably has a winning pawn endgame. Instead, I opted for a move that escapes back rank imprisonment and also gains a tempo on White's centralized rook. 40...f6 41.gxf6 gxf6.

Here I expected White to go back into pawn eating mode with Ra5, but he preferred the positional 42.Re1. The c-pawn in the hand is worth more than material parity. One thing to note about White's move is that Black can no longer play Rh1 and therefore the harassment of the c-pawn is now limited to squares c5-c8. Black's rooks needs more activity, so 42...Rh5 is a decent move.

White now played 43.Re6. Since he could have played this move last turn, I consider the excursion with Re1 a waste of time. However, I let down my guard at this point and contented myself with a passive placement of my rook. 43...Rc5

And I offered a draw. I expected White to play 44.Rxf6+ reestablishing material parity and allowing my king some breathing room. Both sides could nurse their passers. Mine would be more distant. But White declined with 44.Kb4 so I continued with 44...Kf7

Both sides now have rooks en prise. Since it's White's move, I can lose the f6 pawn and we'll then have a pure pawn ending with two pawns on each side. However, Black will have the advantage of the distant passer. The black king can step in front of the c-pawn rather easily, but it's not so easy for the white king to step in front of the h-pawn. Black will then be able to get to the a-pawns quicker and the head start might be decisive. So the offer of a trade is actually a tactical trap. Indeed, the actual line if White chooses to win a pawn leads to a win for Black. e.g. 45.Rxf6+?? Kxf6 46.Kxc5 Ke6 47.Kc6 h5! White will find it necessary to post his king on b7 in order to queen. That means that the h-pawn queens with check and then the black queen and king can make sure c7-c8=Q never works. Now 45.Ra6 ensures a drawish position. Instead my opponent plays an inferior move that sets up his own trap. 45.Re1?!
The idea White is playing for is to maintain the cut off of the black king so that the black rook has to fight the c-pawn by itself. However, Black can refute this plan and grab the advantage by playing 45...Re5!

White will have to content himself with a worse ending. e.g. 46.Rxe5?? fxe5 and the distant passer wins for Black. 46.Rb1 a5+ 47.Ka4 h5 and Black has no trouble pressing his advantage. Unfortunately, I was still in consolidation mode and only had eyes for Rc7 defending my scattered pawns. Unfortunately, the defender needs defending too. It could have been strongly posted at e5, but instead it is passively placed at c7 and vulnerable to attack. So the actual game continued 45...Rc7?

Of note, Stockfish still thinks this is a draw. White pressed on with 46.c5 f5 47.Kb5 h5 48.c6 Kf6 49.Kc5 f4 50.Kd6 which brings us to the previous post.

No comments:
Post a Comment