
Iron Man 3 saw Guy Pearce join Robert Downey, Jr., Don Cheadle, and James Dale in a tag team battle between two Iron Men and two Extremis mutants.
It was fun to see a couple familiar faces. The U.S. President in Iron Man 3 is played by William Sadler, who played Heywood in "The Shawshank Redemption" and butchered reading the name of the author of The Count of Monte Cristo as "Alexander Dumbass". Also, the fake Mandarin is played by Sir Ben Kingsley, who played Bruce Pandolfini in "Searching for Bobby Fischer". Incidentally, a fellow club member who is a New Yorker pointed out that Pandolfini should have had a Brooklyn accent, yet Kingsley played him with an Irish accent. I found this article to explain how that happened.
This post is the fifth and final installment from a semifinal game from my 2015 club championship run. The game is broken into phases running - Memento-like - in reverse chronological order. I have chosen Guy Pearce movie mashups to try to solidify themes of the game phases.
- Practical Rook Endgames 09 is the ultimate phase.
- Practical Rook Endgames 10 is the penultimate phase.
- Practical Rook Endgames 11 is the antepenultimate phase.
- Practical Rook Endgames 12 is the preantepenultimate phase.
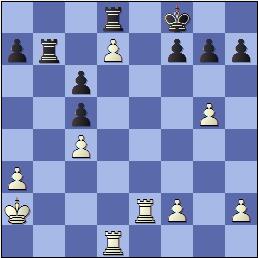
In this fifth installment, we rewind the game another six moves to the point where it became a double rook ending. White to move:

White has a dangerous passed pawn on d6 and the white rooks seem well placed to make it strong. The black rooks are struggling to prevent the pawn from queening and also defending against back rank mates. The white king is pinned against the a-file for now. The most forcing variations would be to queen by force and checkmate or win a rook. Such a variation doesn't exist. However, my opponent hallucinated a promising tactical flourish. Unfortunately for him, the variation he saw was not forcing and it allowed me to gain counterplay. The game continued 32.d7 Rfd8 33.Rb1?

Black to move. My opponent confidently went to the smoking area outside the club and expressed some happy words of confidence. If 33...Rxb1?? 34.Re8+ Rxe8 35.dxe8=Q or =R mate. Similarly, 33...Rxd7?? 34.Rxb8+ Rd8 35.Rxd8 mate. So I obviously should reject those two variations. If Black plays an indifferent move like 33...h6? to create some breathing room for his king, White still has 34.Rxb8 Rxb8 35.Re8+ Rxe8 36.dxe8=Q+. The Re8 variations can be neutralized by simply 33...Kf8! and now Black threatens to take at b1 and then on d7 when White would have nothing. Similarly I could see that with my king now only one step from Ke7 to support Rxd7, the advanced passer was not going to decide this game. White avoided the exchange of rooks with 34.Rd1 Rb7
Stockfish calls this a dead draw. If White decides to hold onto the d-pawn, 35.Red2 Ke7 36.Re1+ Kf8 37.Red1, he'll probably have to settle for a repetition draw. The game continued 35.Rd6 Rbxd7 36.Rxc6 Rd2+ 37.Rxd2 Rxd2+ and we have caught up to the previous post.
Instead of 33.Rb1?, how might White have improved?

Surprisingly, 33.Rde1 seems to be the path to victory. A plausible continuation goes 33...Kf8 34.Re7. White could also transpose and start with 33.Re7 Kf8 34.Rde1. 33.Rde1 allows Black to fall into 34...Rxd7?? 35.Re8+! Rxe8 36.Rxe8 mate. After 34.Re7:

I think this is where imagination helps the master find the right way. In this position, Black is nearly in zugzwang. The black rooks and king are tied to the eighth rank preventing disaster with Re8+. The white king is still trapped on the a-file, but Re1-Re3-Re1 can waste moves while Black can only waste moves with Rb8-a8, allowing the white king to break free and move up the board on a path like Kb3-a4-a5-a6xa7-b6xc5-d6. If Black moves his kingside pawns, the white rooks might gain more loose pawns as targets. Stockfish gives best play as 34...h6 35.gxh6 gxh6 36.R1e5 Kg7 37.Rf5 Rf8 38.Rxc5 Rfd8 39.Rf5 Rf8 40.h4 and evaluates this as about +4.0 winning for White.

So there you have it, a wild, blunderful rook endgame where I was:
- lost after 32...Rfd8 33.Rde1
- equal after 33.Rb1? Kf8!
- winning after 45.Re1?! Re5!
- equal but almost losing after 45...Rc7?!
- lost if my opponent played 51.Kd7 and I couldn't find 51...Rh8! 52.c7 Kf5! 53.Re8 Rh7+ 54.Re7 Rh8 55.c8=Q Rxc8 56.Kxc8 a6!!=
- and equal through my last move 59...Kf6
- when my opponent resigned in a drawn position
- No one ever drew a game by resigning.
- Always keep your rook as active as possible.
- Time is of the essence, almost all the time.
- Don't give your opponent easy decisions.
- Rook endgames are not just tactical; look for positional cutoffs and binds.
- Two pawns, even if disconnected, can give a rook fits
- Don't take any exchanges for granted in calculations.
No comments:
Post a Comment