Sunday, June 29, 2014

Nontrivial

I think I have lost respect for pawn endings. Arrogance requires that you look down on something, so why not the pawn? But I had to eat humble pie when going over a few pawn endings recently. Two are from Chernev's Practical Chess Endings, mentioned earlier in my post Winter Melon. The third is from my own game where I probably prematurely agreed to a draw.

Practical Chess Endings #26
Grigoriev 1932

White to play and win

White has the distant rook pawn. Black has a bishop pawn. With White to move, Black can stay in the square of the pawn, so it's likely a king move is in order. The shouldering type of move to knock Black off the h1-a8 diagonal begins with 1.Kf5! Ke3 2.Ke5! If Black persists all the way to 2...Kd3 3.Kd5 Kc3 4.Kc5, Black can't approach the pawn with 4...Kb3, but 4...Kb2 5.a4 easily loses. Instead, Black tries to disrupt the path of White's king. 2...c6 3.a4! White's pawn escapes from being chased down by Black's king. In order to ensure his pawn is not captured with 3...c5 4.Kd5, Black has to move 3...Kd3 4.a5! c5 5.a6! c4 6.a7! c3 7.a8Q! c2. White must be careful because of the drawing chances afforded by the bishop pawn. If Black's king can get to a1/b1, it's a draw because Black either queens or gets stalemated by Qxc2. Luckily, the White king is close enough to play a part. 8.Qd5+! and depending on where Black moves, White needs to continue to use precise moves.

Variation 1A: 8...Kc3 9.Qd4+! Kb3 10.Qa1! I like how White's queen beats the Black king to the corner. After Qc1, White can patiently move up his king and capture the would-be Black queen.

Variation 1B: 8...Ke3 White must notice that on e3, the Black King is skewerable to a possible new Black Queen on c1. 9.Qg2! is the only move that wins. Other moves allow Kd2 and draw ensues. If Black queens with 9...c1Q, then 10.Qg5+! skewers. The only other move available to Black is 8...Kd3. Here, the same 9.Qg5! ensures Qc1 blockading the pawn if necessary.

Variation 1C: 8...Ke2 White must delay the pawn and get his king closer for mate. 9.Qa2! is another only winning move. 9...Kd1 10.Ke4 c1Q 11.Kd3! and Black is helpless.

Practical Chess Endings #26
Grigoriev 1931

White to play and win

White is actually behind in material. If Black were to move, he could distract White's king starting with 1...g5 just long enough for the Black king to at least reach f8 to pin White king on the h-file. One key idea is that in a queening race, White needs to queen at g8 with check in order to win. This explains the funny roundabout paths that the White king takes in forcing Black to sacrifice the g-pawn.1.h4! h5 2.Kf8! g6 3.Ke7! g5 4.hxg5! h4 5.g6! h3 6.g7! h2 7.g8Q+!

Tournament Game

White to move, Black to press for a win

Note that this board is flipped so that it's from Black's point of view. This last position is the second-to-last position of a game that I played just three weeks ago. White had the move and offered a draw. I, playing Black, said to my opponent that he should properly make a move and then offer his draw. With best play, the position is a draw, but there's more than meets the eye. Here are a few scenarios to show it.

In the actual game, White played 1.a5 and offered the draw. Black to play for a win should keep pawns on the board with 1...b5 Then White has to decide what to do with his move.

Variation 3A: 2.g4 fxg4 3.Kxg4 Kd5 4.Kf5 Kc4 5.Ke5 Kxb4 and White has no hope of stopping a pawn from queening.

Variation 3B: 2.Kg5 Ke5 3.Kg6 f4! 4.gxf4+ Kxf4 5.Kf6 Ke4 White captures Black's pawns and queens without difficulty.

Variation 3C: If White tries to wait it out, Black can force things. 1.Kf3 Kd5 (1.Ke3 Ke5 2.Kf3 Kd5 transposes; 2.Kd3 Kd5 just puts White further behind the race with either 3.Kc3 Ke4 or 3.Ke3 Kc4) 2.Kf4 Kc4 3.Kxf5 Kxb4 4.g4 Ka4 (4...Kxa5 loses because the b-pawn gets slowed down by a chasing White King acting as the Winter Melon.) 5.g5 b4 6.g6 b3 7.g7 b2 8.g8Q b1Q+ and Black can try to push for the win with one extra pawn. It's a tablebase draw, but Black risks little if he wants to pursue it.

The same variations tend to happen even if White leaves the queenside pawns alone. The Black King is closer to capturing the queenside pawns and can use a timely b5 to get them even closer.

Friday, June 27, 2014

TPS Report #18

Around November 2012, I set a 4-year goal of trying to ratchet my rating from 2018 at the time up to 2100 by November 2016. I had hoped to use a mantra of "Two steps forward, one step back." to allow myself to fail here and there on my way up. But six months later, in May 2013, discouraged all around, I gave up chess again.

But six months after that, I built up enough enthusiasm reserves to come back in November 2013 and try again. With some encouragement from a friend, I found ways in the past eight months to remain excited about chess. My new training regimen is weekly get-togethers with chess friends, Chess Tempo for tactics, and Chess Position Trainer for openings. I generally choose openings that are accessible by transposition, slightly obscure, open, and trappy.

In 2014, I have played 30 games of regular rated, tournament chess without getting burned out. My record is 17 wins, 7 draws, 6 losses. 2014 is only half over and I'm just two games shy of equalling the total number of tournament games I played in all of 2010-2013. Possibly helped by the USCF's new K-factor policy for players in the ratings range of 1900-2100, my rating has risen to an all-time high of 2099. If I were to rate my current 4-game match, my rating would rise to 2104, so I feel that I have already achieved my four-year goal in just 1.5 years. I have also won my third trophy and also earned my fifth and final norm for the USCF Candidate Master norm title. The last time I earned a norm or won a trophy was 10 years ago. And my tournament performance ratings have ranged from 2021 up to 2289.

After a bit of self-congratulation, I move to the next goal. The 2200 summit lies ahead. Before I get there, it would be nice to win an Expert section trophy. I'll give myself a generous four years from now to reach these two goals. Impatient frustration should be minimized with this long horizon.

Sunday, June 22, 2014

Winter Melon

When I'm not playing chess, sometimes I play Plants versus Zombies. One of my favorite weapons to plant is the Winter Melon which not only causes splash damage, but it also slows down the zombies over a 3x3 area.

Recently, I almost gave away my copy of Chernev's Practical Chess Openings. But after my last endgame debacle, I went looking for a reference on rook versus two connected pawns and found it in Chernev's book. Perusing the beginning pages, I ran across some pawn endings that were far from trivial. In each of these three endgame studies, it is helpful to remember that the attacking king can be used like the Winter Melon to slow down the enemy pawn.

Practical Chess Endings #23
Grigoriev 1928

White to play and win

It should be clear after a little calculation that a pure pawn race leads to a draw. Even though White's pawn can queen with check, Black's pawn first reaches b3 and gains a tempo because of the check on White's king. e.g. 1.g4? b5 2.g5 b4 3.g6 b3+ 4.Kd2 b2 5.g7 b1Q 6.g8Q+ 7.Qb3=. Because of this, White embarks on a short walk with his king to c4, forcing Black to mirror the same short walk to a4. When Black's pawn checks the White king during its advance, White moves the king back toward c2 via d3. This forces Black to move his king back to a2. White then queens with check and wins. In the drawing line above, Black moves his king zero times to White's one time. In the following winning line, White and Black each move their kings four times before White queens with check.1.Kc3! Ka3 2.Kc4! Ka4 3.g4! b5+ 4.Kd3! b4 5.g5! b3 6.g6! b2 7.Kc2! Ka3 8.g7! Ka2 9.g8Q+! Ka3 10.Qb3#

Practical Chess Endings #24
Duras 1905

White to play and win

I have previously generalized that it is dangerous to step on a square that allows the opponent to queen with check, but in this study, that's the only move that wins. If 1.Kc4?, then Black steps in front of his own pawn 1...Kg6 or 1...Kg5 and can draw by hightailing it to b8, preventing White from queening. The key idea is to invest time moving the White king from c5 to f2. This forces Black to move his king to h2 where it will be checked by the new White queen. 1.Kc5! g5 2.b4! g4 3.Kd4! g3 4.Ke3! Kg5 {slowed} 5.b5! Kg4 {slowed} 6.b6! g2 7.Kf2! Kh3 {slowed} 8.b7! Kh2 {forced onto a queen-with-check square} 9.b8Q+ Kh3 10.Qg3#

Practical Chess Endings #25
Mandler 1938

White to play and win

Notice that White has a bishop pawn this time instead of a knight pawn in the two other studies. Again, one idea I have in endgames is that you should try to gobble your opponent's pawns as fast as you can. Here 1.Kxb7? only draws because Black can run down White's pawn beginning with 1...Kb3! 2.f4 (2.Kc6 Kc4! 3.f4 Kd4!=) 2...Kc4! 3.f5 Kd5!=. Of course, a pure pawn race only draws. 1.f4? b5 2.f5 b4 3.f6 b3 4.f7 b2 5.f8Q b1Q=. Instead, White wins by doing triple duty with his king: 1.blocking the Black king from chasing White's pawn along the a2-f7 diagonal, 2.slowing down Black's pawn advance later moves, and 3.helping to threaten mate after the pawns queen. 1.Kd6! Ka3 {slowed} (1...b5 2.Kc5 Kb3 3.Kxb5 Kc3 4.Kc5 {and White will preserve his pawn for the win.}) 2.Kc5! Ka4 {slowed} 3.f4! b5 4.f5 b4 5.Kc4 b3 6.Kc3! Ka3 {forced onto a queen-with-check square} 7.f6 b2 8.f7 b1Q 9.f8Q+ Ka4 10.Qa8+! Kb5 11.Qb8+ Kc5 12.Qxb1.

Friday, June 20, 2014

Four Chess Movie Reviews

I've been watching the chess selection on Netflix. Unfortunately the selection is rather narrow and the quality quite variable. I already reviewed Queen to Play, which I really liked. Here's a brief run-down of four other chess movies I have seen recently.

Brooklyn Castle is a documentary following Brooklyn's Intermediate School 318 (I.S.318) chess team as it competes through the 2009 and 2010 chess tournament circuit and struggles with school budget cuts. I had caught glimpses of the players through coach Elizabeth Vicary's blog, but having a coherent narrative was quite compelling. I give it four stars out of five for compelling documentary subject matter and high production value.

Game Over: Kasparov and the Machine is a documentary about the 1997 rematch between Garry Kasparov and IBM's Deeper Blue in which the machine beats the human. It was nice to see a large collection of interviews from numerous prominent figures on all sides: Kasparov's team, IBM's team, and the chess commentariat. I felt that the documentary owed a lot to the controversy surrounding the match on whether Kasparov was out of line to accuse IBM of cheating and whether IBM was out of line in its de facto use of psychological warfare on Kasparov in a "friendly" match. The 1996 match probably only generated one hundredth as much press. I think the movie relied too heavily on splicing in footage of "The Turk" and it seemed that they lingered too many times on Kasparov's pained facial expressions. I give it three stars out of five for compelling documentary subject matter and medium production value.

Pawn's Move is a fictional story of a young man who apparently inherits a fortune in his mentor's pawn shop and decides to run away from a gold-digging girlfriend to a small town refuge. He finds new friends, but eventually problems catch up to him and his new friends. The movie has a strong religious theme which seems to dovetail with chess in that it preaches personal responsibility for one's decisions on and off the board. I give it two stars out of five for a mediocre story in a mediocre production.

Checkmate is a fictional story of a young man who is offered a chance to get to law school if he wins a chess tournament. This movie is the tail-ender of the group in ranking. The production seems to be the stuff of film school with bad sets, bad writing, and bad acting. The opening premise is ridiculous and the ending is equally pedestrian, only of interest in that the contestants replay the moves of Morphy's Opera Game. I give it zero stars out of five for a lame story and poor production value.

Sunday, June 15, 2014

Queen and Bishop

Here is a trio of queen and bishop combinations that I have encountered recently. The first is from a 2013 master game. The next four are from games I have played within the last 45 days.


White to move

White missed the crushing continuation 33.Rxh7+ Kxh7 34.Bd3+. If 34...Kg8, then 35.Bc4 pins queen to king. If 34...Kg7, then 35.h6+! and now if 35...Kxh6 36.Qf6+ Kh5 37.Be2+ Qf3 38.Bxf3#. If 34...Kh8 35.Qf6+ Kg8 36.Qg7#. If 34...Kg8 35.Qf6, Black has to sac his queen for the h-pawn to stop Qg7#. The game continued 33.Qf6+ Kg8 34.Bf3?. White again missed that 34.Rxh7 was crushing 34...Kxh7 35.Qg6+ Kh8 36.Bd3 and Black has to play 36...Qxd3 37.Qxd3 to stave off mate. The game fizzled to a draw.


White to move

I saw the continuation 35.Qd6! but thought that 35...Rhd8 36.Bxd8 Rxd8 was still too much material for my opponent. I didn't realize that I had a better move that collapses Black's house of cards. 35.Qd6! Rhd8? 36.Bc3! Either the knight or the bishop goes with check. Black's best continuation is 35.Qd6! Rhg8! where White has to content himself with 36.d8=Q Raxd8 37.Bxd8 Rxg2+ 38.Kf1 Rg6 36.Ke2! when both kings are on the run.


Black to move

I chose a winning line of 29...Qh6+ 30.Kg1 Bd6 31.Rf2? (31.g5! Qxg5 32.Nf3 makes it difficult for Black to cash in because 32...Qg6! is the only move that maintains a win) 31...Bg3 32.e4 Bxf2+ 33.Kxf2 Qf4+ 34.Kg1, but the computer likes 29...Bg5 better by 1.5 pawns because it avoids the 31.g5 line and removes Black's e-pawn: 30.Rf2 Qh6+ 31.Kg1 Bxe3 32.Nf1. After the game's 34.Kg1, I was able to calculate thirteen plies toward a mate and know that White was probably losing another minor piece. 34...Rc8 35.Qf3 Qxd2 36.Qxf7+ Kh8 37.Qxb7 Rc1+ 38.Kh2 Qf4+ 39.g3 Qf2+ 40.Kh3 Rh1#


White to move

20.Nxf7 prompted immediate resignation.


White to move

14.Qe4! also prompted immediate resignation. Coincidentally, in these last two games, both of my opponents had just played b6.

Saturday, June 14, 2014

Know versus Feel

Near the end of U2's song, Beautiful Day, lyrics go:

What you don't have you don't need it now.
What you don't know you can feel it somehow.
What you don't have you don't need it now, don't need it now.

I have already written about sensation versus intuition. This topic is slightly different, encompassing more of what is knowable in a position in which I was too lazy to calculate beyond certain feelings.

A couple friends and I got together to look at some games we played. One game ended with a won rook ending. I took the contrary position during the analysis and tried to prove a draw with best play, quoting Tarrasch's hyperbolic "All rook endings are drawn." A couple days later in a club match where I was leading 1.5-0.5, we reached the following position before Black's 20th move after an exchange of bishops on c2. I'm playing Black.
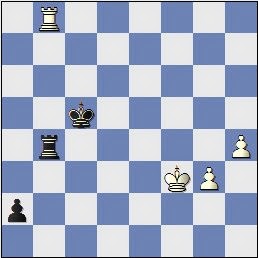

Black to move

Material is equal at 7 pawns and 2 rooks apiece. Black's pawns are more advanced on the queenside; White's a little more advanced on the kingside. White has the better center with the stonewall-like d- and f-pawns against the backward e6 pawn. I came up with a plan to attack White's d-pawn with the c5 advance, but I wanted to prepare c5 with moves such as a5-a4 and/or Kc8-c7-b6 so that white doesn't get a protected passer after c5 dxc5 {moves} b4. Much of my time on this move was spent trying to make c5 work and also trying to figure out if I needed to redeploy my rooks to the e-file in preparation for e6-e5. The problem with putting the first rook on e8 is that White could use the pin and try f4-f5. Eventually, I decided that I would double on the d-file, put my king on b6, and then advance c5 when White would probably capture dxc5 with check and then Kxc5 as long as there isn't a white pawn on b4. Once White's d-pawn is gone, then I can try to advance e6-e5. The game continued 20...Rd8. I overlooked my opponent's plans, but this didn't hurt me too much. 21.a4!?.


Black to move

Now I started to calculate what happens among the a-, b-, and c-pawns. I didn't like the fact that if I allowed axb5, I'd probably have to recapture cxb5 and then I might never remove the backwardness of the e6 pawn. If I advanced 21...b4, then 22.cxb4 axb4 23.b3 gives White a protected passed a-pawn. The third alternative was 21...bxa4 allows White's rook to enter my position with 22.Ra1 and possibilities of Rxa4xa5-a7, but I figured I have time to make trouble with 22...c5, capture on d4, maybe land a protected rook on d2 with check, and further maybe capture Rxg2. I could see that White could bail out of the rampaging rooks variation with an eventual Rxd4 in which case I would probably have to capture twice on d4 and lose the e6 pawn, but it was weak anyway, so why not give it up? So I chose this last plan. 21...bxa4 22.Ra1 c5 23.Rxa4 cxd4.


White to move

Fritz prefers 24.Rxa5 dxc3= for White versus White's choice in the game. White chose 24.Rc4+. Is is better to go Kd7 or Kb7? Kd7 looked very unattractive because it temporarily undoubles my rooks, preventing them from putting enough pressure on d4 to win a pawn. The main benefit is to protect the weak pawn at e6. If 24...Kd7 25.cxd4, I'm stuck with a backward e6 pawn again. But Fritz prefers this and concludes that 25...Rd5 favors Black by about a half a pawn. White has two isolani (b2, d4) while Black has one isolani (a5) and one backward pawn (e6). I dodged 24...Kb7 25.Rxd4 Rxd4 26.cxd4 Rxd4 27.Rxe6


Black to move

Now that my weak e6 pawn is gone, I relaxed and began to think that a draw was almost in hand. "All rook endings are drawn." I have a decision to give up my g7 pawn for his f4 pawn or defend g7 with a passive rook placement like 26...Rd7. Would I rather have the passive rook and a symmetrical pawn position or an active rook but with fractured f- and h-pawns? I chose the latter because I felt that my pawn on a5 was probably going to get surrounded if I became too passive. 27...Rxf4 28.Re7+


Black to move

A subtle point. Should Black put his pawn on b6 or c6? Fritz likes c6 by a few hundredths of a pawn. Consolidating weaknesses is one principle I try to follow. It saves a tempo if White plays Ra7, but Black would get the tempo back after Kb6 forces the rook to either back up to a8 or move off the a-file. Kc6 is slightly more central and flexible. One major disadvantage of Kb6 that I failed to appreciate is that White can indirectly defend his b2 pawn as we'll see later. 28...Kb6 29.Rxg7


Black to move

At this point in the game, I think I lost concentration. Time control was no real factor. My opponent and I each had about 40 minutes to make 1-2 moves and then we would have an hour after that. I had gotten to a rook ending with equal material. And "All rook endings are drawn." was fresh on my mind. I had threats of pinning White's king and pawns back with Rf2+. I had the slightly better king at b6 and more advanced pawns, especially a5. An aggressive line would be 28...a4 29.Kc3 (to avoid the pawn-forking Rf2+) h5 30.Rg8 h4 and White has almost no play except checking the Black king. Instead of thinking of how I could press, I felt it was time for some mindless consolidation. 29...Rf5? 30.h4 (taking advantage of Rf5?) h5 31.g3


Black to move

Thanks to my mindless play, White now has the possibility of sacrificing g3-g4 to spring the h4 pawn in a queening race. Since White's king ends up more centralized, the g-pawn is much less of a threat than the distant h-pawn. Again from the position above, I played mindlessly. 31...Kb5 32.Kc3


Black to move

In isolation, 31...Kb5 turned out to not be a dubious move, even though it gives White skewering possibilities. 31...Kc5 would have been more centralized. I forgot that the a5 pawn was still protected laterally by Rf5 as long as the rook doesn't get kicked by White's king coming to e4. An aggressive continuation I didn't even think about is 32...Rf3+ 33.Kd4 Ka4 34.Ke4 Rb3 35.Kf5 Rxb2 36.Kxf6 Rg2. But 31...Kb5 combined with the game continuation helped me lose several tempi. 32...a4?! 33.Kd4


Black to move

Because I didn't choose 31...Kc5, White's king is now aggressively centralized at d4. Because I chose 31...Kb5, a plan to attack the newly vulnerable b2 pawn with 33...Rf2 34.Ke3 Rxb2?? runs into 35.Rb7+. Because I chose 32...a4, Ka4 is not available for me to hide from a skewer. Still, 33...Rf2 is the best continuation as the Black Rook can just play tag with the White King without capturing the b2 pawn. e.g. 33...Rf2 34.Ke3 Rg2 35.Kf3 Rd2, perhaps intending Kc4 and Rxb2. Instead, I meekly avoided the skewer with 33...Kb6. Only that didn't work because White put the skewer back on the table with 34.Rg8 Rf2 35.Ke3 Rf5 36.Ke4 Rf2 37.Rh8 Ra8 38.Ra8+ Kb5 39.Rh8


Black to move

If I were looking for a draw, I should have played the repetition 39...Ka6, but I thought that Ka6 was inferior to Kc6 because if I had intended to capture Rxb2, I have to respond to Ra8+ with Kb7 dropping the a-pawn instead of allowing Rb8+ skewering to my rook at b2. But because I had done the analysis on move 33 with White's king on d4, I didn't consider that my king could now go to c4 and then b3. Ka2 appeared in some of my fantasy variations, but it's bad because of Rb4 and if the rooks come off, White's sacrifice g3-g4 wins (my move 29 comes back to haunt me). If Black tries to prevent g4 in this Ka2 line, e.g. 39...Kc4 40.Rc8+ Kb3 41.Rb8+ Ka2?? 42.Rb4 f5+ 43.Ke5 Rf3 44.Rxa4+ Kxb2 45.Rf4 Rxg3 and White still has a tablebase win. Another subtle point about rook endgames is that 39...f5+ 40.Ke3 is not so good for Black because now his pawns can be quickly gobbled by the White rook. Slowing the pawn slaughter by keeping pawns two rook moves apart is useful when time is a factor. 39...Kc6 40.Rxa5 Rxb2


White to move

Here I had fantasies of winning. I predicted 41.Ra5 Rb4+ and if 42.Kf5?? then Rb5+ starts a pawn race where I queen first. With help from Fritz, I see now that Black should come out of it with one extra pawn 43.Rxb5 Kxb5 44.h5 a3 45.h6 a2 46.h7 a1=Q 47.h8=Q Qe5+ 48.Kg6 Qxg3+ 49.Kf7 (49.Kxf6?? Qc3+ skewers) Qc7+ 50.Kg6 Qc2+ 51.Kf7 f5 with a tablebase draw. Also, it seems pretty clear that 41.Ra5 Rb4+ 42.Kf3 Kb6 43.Ra8 Kb7 44.Ra5 Kb6 is drawing. But my opponent's move here surprised me. 41.Rf5! The exclam is not so much because it's winning, but that it keeps winning chances alive for White. Notice that Rxf5+ gains a tempo because my king is not on c4. After 41.Rf5, I noticed that my a-pawn just needs some precise blocking and he could go all the way. One idea that came to me was to try to get White's king to interfere with the White rook's defense of the queening square. so I played 41...Rb4+ 42.Kf3 (it's blocking Rf1!) a3 43.Rxf6+ Kb5 44.Rf8

Diagram A

Black to move

There are about four ways to go from this diagram which I have labeled Diagram A. One easily draws. One possibly wins. One draws with difficulty. One obviously loses. My only excuse for choosing the obvious loss is that the ups and downs of draws and wins were getting to me. I still had plenty of time. I still felt that I had a draw even though White had connected passers and I was down a pawn. I even thought if White were imprecise, I could win. But the more I calculated, the more I knew that I couldn't queen the a-pawn. The disappointment of failing to queen created enough emotion that my decision making was far from objective.

The Easy Draw: From Diagram A: 44...Ra4 then 45.Rb8+ Kc4 46.Rb1 a2 47.Ra1 leaves the White rook passive.

Diagram B

Black to move

If White never moves his rook, the a-pawn will never queen. Black keeps his rook on the a-file. Black can draw by either 47...Kc3 48.h5 Kb2 49.Rh1 a1=Q 50.Rxa1 Rxa1 or more easily with 47...Kd5. If the White king comes over to b2 to capture a2, Black should be able to knock out one or both of White's kingside pawns. The activity of the Black rook checking laterally from the a-file should be enough to draw easily. However, I didn't calculate deep enough to know that having White's rook trapped on a1 was enough to draw.

The Possible Win: From Diagram A: 44...a2! 45.Rb8+! Kc4 46.Ra8 Kb3 47.Rxa2 Kxa2.

Diagram C

White to move

Now from Diagram B, with White to move, Fritz likes Black by two whole pawns, but the Shredder online tablebase says this is a draw. However, false steps from White can lead to a win for Black. Some techniques to know for Black are that having the rook on White's fourth rank is good. If a pawn tries to run offside to the sixth rank, the rook can run down a lone pawn. e.g. 48.h5 Kb3 49.h6?? Ra6 50.h7 Rh6. Having the rook on the fourth helps prevent the White king assisting in the pawns' advance. In order for White to have winning chances, he needs to get both pawns to the sixth. From Diagram B, that requires 5 tempi during which time, Black's King could have walked from h2 to f7 or f6. With Black king and Black rook watching over the queeening squares, even two pawns on the sixth would probably lose, assuming White's king is on f3. If it doesn't make sense to leave the Black rook on b4, the maneuver Rb4-Rb1-Rg1/Rh1 is also valuable. Another Tarrasch quote is "Always put the rook behind the pawn.... Except when it is incorrect to do so." The Black king would like to blockade the pawns from their front, but one of the drawing variations involved the Black king helping the rook capture a pawn from behind.

The Difficult Draw: In analyzing Diagram A, I figured I could force White's rook off the board, but I would be two tempi behind Diagram A. I didn't realize I could capture his rook on a2 because of the overlooked threat of Ra4 after Kb3. What so strange is that back in Diagram A, I recognized the threat of Ra4, but I couldn't see the same threat if I moved my king Kb5-c4-b3 or Kb5-a4-b3. I felt that my king would have to advance to b2 before I could queen the pawn at a1 and then the rook would sac for the queen: 44...a2 45.Rb8+ Kc4 46.Ra8 Kb3 47.g4?? Kb2?? 48.h5?? a1=Q?? (48...Rb3+ 49.Kf4 Ra3 still wins for Black) 49.Rxa1 Kxa1.

Diagram D

White to move

Diagram D is a tablebase win for White beginning with 50.h6! This is what I feared when I chose the worst continuation and overlooked my chances in the first two variations.

The Obvious Loss that I chose: From Diagram A, 44...a2! 45.Rb8!+ My opponent pretended to move 45.Ra8 before releasing the rook on b8. He knew Ra8 was losing and was just messing with me. 45.Ra8?? loses to 45...Ra4 and the pawn does queen despite efforts to get back to the first rank such as 46.Rb8+ Ka5 47.Ra8+ Kb4 48.Rb8+ Ka3!. The losing move was 45...Kc5??

The Losing Blunder

White to move

It's incomprehensible that I thought I could defend against the connected passers. I had this lame feeling that White would allow me to blockade the pawns and grab one or that I had the opportunity to distract White by queening the a-pawn and then grabbing one of his pawns. To his credit, my opponent steadily advances without giving me this chance. With threats of mate, I had to give up the a-pawn for nothing. Here's the complete game for play-through.

What I don't have now is a one-point lead in the match. It's tied at 1.5-1.5. I have White next and could still win, but I could also lose the next game and the match. This game paralleled somewhat our first encounter when he drifted through a drawish endgame and lost. In summary:

  • Not all rook endings are drawn.
  • Don't feel your way through rook endings. Know them through actual calculation.
  • Beware of superficial analysis. (29...Rf5?, missing that 39...Kc4 was available, missing that 47.Rxa2 is forced after 46...Kb3.)
  • One rook beats two pawns if they are not advanced. (Diagram B versus Diagram C)
  • Watch the lines where kings and rooks are treading. (Black's 31...Kb5, 33...Kb6, and 38...Kb5. White's 42.Kf3.

Monday, June 2, 2014

Suicide Queens

I worked through some tactics recently and noticed a group of tactics having a similar theme. When queens of both sides are in danger, not necessarily about to capture each other, it pays to look at in-between moves where your queen sacrifices itself for a piece, instead of preserving your queen or capturing your opponent's queen. Although I've given away the key idea, try to work through these three diagrams in your usual systematic or haphazard way and decide which move is the strongest. The first two are possible positions from openings I study and the third is Chess Tempo #76859.

Diagram 1: White to play and find the best move

Diagram 2: White to play and win

Diagram 3: Black to play and win

The solutions are as follow:

  • Diagram 1: 1.Qxg6 - There isn't a great amount of advantage between this and simply 1.Bxd8, but Qxg6 is still the highest rated move
  • Diagram 2: 1.Qxc6+ Nxc6 2.Bxb3 - The rook is more tempting, but the knight comes off with check.
  • Diagram 3: 1...d6+ 2.Bc2 Qxf4! - A hard move to find in the middle of complications. If Black tries 2...Be4, 3.fxe3 removes Black's biggest advantage.

It's important if you're playing an in-between move, make sure that your opponent doesn't have a similar in-between move. In Diagram 1, notice that 1.Qxg6 protects the assassin bishop on f6 and Black has no checks. In Diagram 2, 1.Qxc6+ captures with check and limits Black's choices. In Diagram 3, the desperado queen playing 2...Qxf4 doesn't capture with check, allowing Black to check with 3.Bf5+, but Black would just capture 3...Qxf5. White's poor queen doesn't have any checks or in-between captures except for the measly pawn.