Showing posts with label My Games. Show all posts

Wednesday, November 29, 2017

Morphyesque

I had been casting about for things to pique my interest and thought that reading a book about Paul Morphy might do the trick. I had done some translating of a German book about Leonid Kubbel and thought that translating a Spanish book about Morphy might also be entertaining. Alas, most games were listed in this book with little commentary. Eventually, I found Johann Lowenthal's book on Morphy. While dated, it provided me with a suitable biography and a selection of games against Adolf Anderssen. It was rather sad to read of his problems late in life and the fact that he never seemed to have a worthy rival to push him to greater heights. None of his games are in Burgess' World's Greatest Chess Games, not even the Opera Game, since his opposition during his brilliant games was rather weak.

With only a modicum of humility, I submit one of the games I played this year for the adjective of Morphyesque. In any event, I might as well dedicate this game to his memory. It was played at tournament time controls against an opponent with Elo 1900. It is short enough that I'm not going to use any diagrams, but instead appeal to the reader to try to follow the game "blindfolded". I have White against N.N.(1900).

1. e4 e5 2. Bc4 Nf6 3. d4 The Urusov Gambit is like the Scotch Gambit for the Bishop's Opening. It aims to open up the game quickly where tactics may provide for a quick win for White. There are a decent number of transpositions to Two Knights Defense and the Max Lange Attack. 3...Nxe4 Risky, but not bad yet. The worst part of this move is that Black begins to violate all kinds of opening principles, e.g. moving pieces multiple times and falling way behind in development. 4. dxe5 Notice that the knight is centralized but awkward because the pawn prevents the natural retreat to f6. 4...Nc5 5. Nf3 Ne6 6. O-O White hasn't even gambited a pawn and he has a strong e5 pawn, two naturally strong minor pieces, a castled king, and some possible heavy piece action on the d- and e-file. Black does not sense the danger and tries to catch up in development with an aggressive piece posting. 6...Bc5 7. Nc3 With the e5 pawn leading the charge, I have the natural Ne4 coming. My opponent saw this move and wasted two more tempi getting his bishop to a7. 7...a6? 8. Ne4 Ba7??

What move should White play? Hint: It's a developing move. If you are following along with no chess board in front of you, Black has two pieces developed: a knight at e6 and a bishop at a7. He also has moved one pawn to a6 and his e-pawn is missing. The rest of his pieces including QR, QN, QB, Q, K, and KR are on their home squares. White on the other hand has knights at e4 and f3, a bishop at c4, kingside castling, and the QR, QB, and Q on home squares.

9. Bg5! It looks like White is going to let Black exchange off a pair of pieces, but White gets the better of the deal. While Black loses a defender at e6, White gets the g5 outpost for his knight and opens a path to h5 for his queen. Development begets development. The pawn at e5 assures that f6 is only going to lose material for Black. 9...Nxg5 10. Nfxg5! O-O What's the naturally aggressive follow-up? 11. Qh5 h6 to prevent Qxh7#. I had calculated most of the outcome from here, but I must confess, that I didn't know what I would do if after my next move, Black sacrifices his queen. I thought I would just win the queen with Nxg5, but in another line without the queen sac, I saw that Nf6+ was strong. It turns out it remains strong even after the queen sac. I played a fun move here. 12. Qg6! My opponent resigned, so I didn't have to make the error of 12...Qxg5 13. Nxg5?!. I rationalize that maybe I would have found 12...Qxg5 13. Nf6+! Qxf6 14. exf6 and with two pins on the pawns in front of his king, Black is helpless to stop 15. Qxg7#.

Monday, July 24, 2017

A Fairly Simple Miss

My chess enthusiasm has been waning a bit even as my rating hit a peak of 2140 after winning a semifinal match in the club championship. I'm currently down 0-1 in the finals, so the struggle continues. Much of what brings me to chess can be attributed to two things: 1. defending my repertoire as the right way (at least for me) to play; and 2. other people's enthusiasm. By this I mean that I spend time with club players who seem to have a purer enjoyment of the game than mine. A new kid came to town and seemed quite keen on playing blitz with some skill. I invited him to our favorite coffee shop chess hangout and played a few games with him on Sunday.

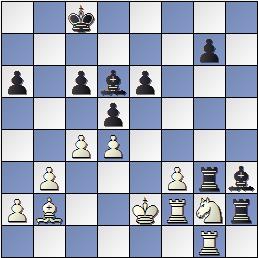
One endgame stuck out in my memory and after I reconstructed it at home, I discovered something both of us missed. My opponent lost the exchange at one point and was annoyingly hanging on. I knew that my rook was better and that at some point, I needed to trade rook for bishop and pawn and win in the pure pawn ending. Here was a position right before that exchange took place. I was actually playing Black, but the diagrams work out better this way. White just played Rg4. Black to move:

I have surrounded the g5 pawn and plan on taking it soon. The rook is preventing Black from breaking through on the queenside. I could see my opponent do some quick calculations and decide that the pawn ending was drawn. He then played Bf4, probably as a prelude to Kb4 and Kxb3.

White to play: What's the best move? I had been prepared to take the bishop for a while. Now that the opportunity was present, I lost objectivity and only looked at my rook and his bishop disappearing from the board. I played Rxf4? and gxf4 Kxf4 quickly ensued. Now with Black to move, this is the position:

We soon found ourselves in a drawn Q+PvQ ending, confirmed by tablebases. In the previous diagram, what should I have played? I could have gained one critical tempo with the killer move Rxg5. Now if Black wants to regain the exchange with Bxg5 Kxg5, my king is magically transported from f4 to g5 with Black to move:

But this time my pawn queens quickly enough to win.

Monday, March 20, 2017

Tomb Raider

The Tomb Raider franchise began in 1996 when game studio Core Design released under its parent company Eidos Interactive, a third-person 3D action adventure featuring acrobatic (and shapely) Lara Croft as the Tomb Raider navigating through traps. Since that time, the franchise has gone on to publish about fifteen game titles and inspire two movies starring Angelina Jolie. A reboot of the film franchise is in development with Alicia Vikander (from Ex Machina) in the title role.

I won a game last month that reminded me of the Tomb Raider. My opponent offered material for the possibility of trapping my queen. I stayed one step ahead of the traps and managed to escape with the material advantage intact. I'm playing Black. White's 20th move was 20.Qc2-e2, loosening the protection of the Nb3, to which I responded 20...Qc7-d7 threatening to capture the white pawn on a4 and having a follow-up threat against Nb3 for the next move. Notice that Black has a loose a7 pawn.

My opponent and I were both a little short on time, about 15 minutes to make 10 moves and reach move 30. Ideally, both sides could sink into 30-45 minute thinks and try to work out the next 8-12 plies with some level of certainty before making such committal moves. Barring that, I fell back on intuition that I could use the pawn exchanges at e4 and b4 and my well-placed rooks at c8 and d8 to aid my queen's escape. If the two white rooks came to a1 and b1, the bishop would have trouble discovering the attack of the b-rook because a1 was occupied and Bc1 allows simply Qxc3. If the minor pieces could not trap my queen, then I might be able to sac my queen for a rook, thereby gaining at least material parity. I also used a rough risk-reward calculation: if I took on a4, worst case scenario was that Ra1 forces my queen to retreat to d7 and then I would have to contend with Rxa7. So, sometimes, I used shorter variations than I really should have to substitute for calculated certainty. My opponent sweetened the reward by cutting off the protection of Bb2. 21.Nc2??

I knew that I was getting the a-pawn and at least positional play against a pair of awkward knights (if either knight goes to a1). If he tried to trap my queen with Ra1, I would get the Nb3 and tempo against the loose Bb2. So I took the bait and entered the tomb. 21...Qxa4 22.Ra1

Last chance to bail out with Qd7 Rxa7. No guts no glory. 22...Qxb3 23.Reb1

White is one move away from trapping the Black Queen with Ra3, but Black has several resources to delay that outcome. The most immediate is cxb4. This has the possibility of opening the c-file for the Black rook and it also temporarily prevents Ra3. However, White would almost certainly play Nxb4, keeping the c-file semi-closed. Another resource is dxe4, temporarily giving Black the potential of Qd5, but fxe4 leaves the queen trapped. I already began to see the possibility of a bailout sacrifice to get my queen out of trouble, but I wasn't sure it was going to work. So I went for the pawn exchanges to improve my rooks. 23...dxe4 24.fxe4

24...cxb4 25.Nxb4

A pause now that we're five moves closer to time control. I was annoyed at the weakness of my a7 pawn and the tempo that Rxa7 might get on my Bb7. Since I was already up a knight and a pawn, I calculated that 25...a5 26.Ra3 Qxa3 27.Bxa3 axb4 might be a bailout strategy. Do you see the other possibility of bailout yet? 25...a5 26.Ra3. White moved in to kill my queen.

Even though 26...Qxa3 27.Bxa3 axb4 28.Bxb4 carries the material advantage of queen (9) for rook and two knights (11), White's position seemed annoyingly consolidated. I couldn't see how I was going to organize my pieces for the next round of battle. With White's Nb4 under attack and both our time troubles becoming serious, I decided to play my ace in the hole. 26...Nd4!.

If he captures my queen with Rxb3, I capture his queen with check Nxe2+ with more even exchanges helping Black's endgame. If he captures my knight with cxd4, I capture his knight Qxb4 and get my queen away safely with the knight advantage. If he saves his queen, I save my queen with Qe6. My opponent let his time tick down to about 1 minute for 4 moves as he tried to work out this mess. He finally settled on 27.Qd2 Qe6.

At this point, I figured that White should trade knights and gain a protected passer at d5, e.g. 28.cxd4 axb4 29.d5. Another variation could have gone 28.Nc2 Nxc2 29.Rxc2. However, with his time trouble, White tried too hard to avoid exchanges and came up with a move that made his knight, bishop, and rook awkward. 28.Na2?

With the remaining time on my clock, I retreated while picking on the awkward rook. 28...Nb5 29.Ra4 Nd6 30.Qf2 Bc6. With a piece and a pawn down and the possibility of losing the rook, my opponent resigned. Black's most straightforward win goes 31.Ra3 Nb5 32.Ra4 Qb3 going back to the tomb to loot more treasure.

Monday, March 13, 2017

Brazil

Terry Gilliam's "Brazil" is a movie about a dystopian, Kafkaesque world of bureaucracy, superficiality, and terrorism. The main character descends into criminality and madness when he tries to swim against the current using his conscience, passion, and resourcefulness. One of the images toward the end of the movie involves a heroic figure becoming enveloped and then consumed by flying scraps of paper, a metaphor for the triumph of bureaucracy.

One of my recent games involved enveloping an enemy piece in pins and cross-pins in order to eventually win. Here is the position after Black played 16...h5:

Sam Lowry (Jonathan Pryce) wakes up one night to find the central heating in his apartment has gone on the fritz and is now too hot. He leaves a message with the Central Services answering machine and goes to sleep with his head in the refrigerator.

Black seizes the initiative with a flank attack on White's g4-h3 pawn chain. Note that if g4-g5, Black has the fork Bf4+. 17.Nh4?!.

Sam is awakened by freelance outlaw repairman Archibald "Harry" Tuttle (Robert De Niro represented by the White knight) who tries to resolve the heating problem.

I think that my opponent wanted to try to exploit the hole at g6, but there is no time for that because the Black rooks are going to use the tempo Rh6 to assist in doubling on the h-file. 17...hxg4 18.hxg4 Rh6.

The call to Central Services goes through and two repairmen, Spoor (Bob Hoskins) and Dowser (Derrick O'Connor) are dispatched to Sam's apartment on a collision course with Harry Tuttle.
With some quick thinking, Sam rebuffs the attempt by Spoor and Dowser to bully their way into his apartment by requesting official paperwork, thereby preventing an armed confrontation with Tuttle. Tuttle zips away via a zipline.

White regroups with an awkward sequence: 19.Ng2 Reh8 20.Rg1?!. I mentioned after the game that White should have probably exchanged one pair of rooks so that I wouldn't get so much activity with the second rook on White's third rank.

Far from being defeated, Spoor and Dowser (Black's rook pair) keep showing up at Sam's apartment, once to pull all the ducting out of the walls, and then once more when the system has turned the apartment into a freezer. During the daytime, Sam spends all his efforts at work trying to track down the girl of his dreams, Jill Layton (Kim Greist).

Black's rooks soon lodge in White's position, first at h2 where it causes immobility in the Ng2 because of the looseness of f2. White tries to stabilize his weaknesses by moving his king from c1 to e2. This is double-edged in that his king becomes the target of pins and skewers. 20...Rh2 21.Kc2?! Be8 22.Kd2 Bg6 23.Ke2 R8h3 24.f3. With the third rank pressure preventing White from moving his Rd1 for fear of Bd3+, White blocks this coordination by advancing his f-pawn. But now the knight is pinned to the king.

With the aid of Sam's erratic behavior, Sam (White King) and Jill (King Bishop Pawn) run afoul of the law and are soon labeled as terrorists.

I'm somewhat proud of this next sequence which was not easy to find and advance the attack. The light-squared bishop is hindered by the f3 and g4 pawns. It would really like to participate in the attack on g2 and therefore belongs on e4 or h3, but there is currently no path. Luckily, a pawn break 24...f5! was handy, weakening the f3-g4 structure enough to become porous. Then followed 25.gxf5 Bxf5 26.Rdf1 Rg3 27.Rf2 Bh3.

Once 27.Rf2 appeared on the board, I had to calculate the possibility of 27...Bh3 being answered by Ng2 jumping. The trickiest jump is 28.Nf4 because it cuts the rooks off from their protection by the bishop on d6. At first I thought I had to trade both pairs of rooks 28...Rxf2+ 29.Kxf2 Rxg1, but I worried about 30.Nxh3. I couldn't see clearly enough to find 30...Rh1 which reopens 2 threats of Rxh3 and Rh2+ skewering the Bb2. But I was reassured when I found 28...Rxg1 29.Rxh2 Bxf4 30.Rxh3 Rg2+ 31.Kd3 Rxb2. Unfortunately, the next pair of moves were both blunders. White bluffed and Black blinked with 28.cxd5? exd5?. 28...Bxg2! would have been completely winning as Bxf3+ is difficult to meet. But finally, the White king walks into the trap that Black initiated with 20...Rh2. 29.Kf1. The knight is pinned again.

Sam hatches a daring plan to erase Jill from the Ministry of Information's databases. Unfortunately, Big Brother is more than a one-trick pony. Information Retrieval, e.g. police forces and interrogators, find Sam's hideout, break down the doors, and arrest him.

With the rooks and knight and king largely immobilized, the plan of Bd6-Bf4-Be3 seemed decisive. 29...Bf4 30.Re2. Here I missed the clever zugzwang 30...g5!. 30...Rxf3+ is enough to win, but my advantage falls from 5.9 to 3.0. 31.Rf2 Rxf2+ 32.Kxf2.

Sam finds himself about to be tortured. Suddenly a shot rings out and he is rescued by some commandos, including Harry Tuttle. There is seeming triumph over bureaucracy when Tuttle blows up the Ministry of Information buildings.

A semi-crucial move appears at this point of the game. If I had felt confident with all the pin pressure I had put on the Ng2, I still had to find my way to a winning endgame. The extra pawn at g7 could still win, but the ending should be bishops of same colors to win it. With that in mind, White must not be allowed to unpin the knight and capture Kxf4. Therefore, 32...g5! was necessary. My opponent said he thought he had a chance at this point, but the advance of the g-pawn shut down his last hope. The cocoon around the knight unravels, but the knight is also gone. 33.Kf3 Rxg2 34.Rxg2 Bxg2+ 35.Kxg2 g4

But the falling paper debris from the explosion envelops Tuttle and mummifies him like a spider's prey. Sam rushes to help, but by the time he unravels the paper, Tuttle has seemingly evaporated.
The authorities chase Sam until he finds Jill again and they escape to the idyllic countryside.

The game concluded with fairly simple plans of centralizing the Black king to f5, possibly e4, and trying to queen the g-pawn. The exploitation of two weaknesses is a common endgame principle. 36.Kf2 Kd7 37.Bf3 Ke6 38.Ke2 Kf5 39.Kd3 g3 40.Be1 g2 41.Bf2 Bh2 42.a4 g1=Q 43.Bxg1 Bxg1 44.b4 Kf4 45.Kc3 Ke4 and White resigned.

The unharmed faces of Sam's tormentors, Jack Lint (the Black King Bishop, played by Michael Palin) and Deputy Minister of Information Mr. Helpmann (the Black King, played by Peter Vaughan) interrupt Sam's fantasyscape, revealing that Sam has only escaped his torture by becoming completely delusional.

Sunday, March 12, 2017

Rosetta Stone

The Rosetta Stone was found in Egypt in 1799 having parallel texts of ancient Greek, Demotic, and Egyptian hieroglyphics. The Rosetta Stone proved key to deciphering Egyptian hieroglyphics. I wanted to review one of my wins at the club last month with some attention to the language used to in analysis, from what I was thinking at the time to what postmortem analysis has shown, and try to translate it into Temposchluckerese.

As Black, I had just played 24...Bd7-c8. The evaluation is approximately equal. White's centralized knights and queenside pawn chain to c5 threaten to create a b-pawn passer. Black's f5-e4 pawn chain and attack against the e3 isolani provide central space and counterplay. It looks like Bc8 overprotects a6 from Qxa6 so that my Nc7 is freed up a bit from defensive duties. This increases not only the mobility of the Bc8 and the Nc7, but also the Rd8 which now faces White's Nd4. The main defect of Bd7-c8 is that the c6 pawn is now held only by my Qh6. I had been keeping my eye on White's weak e3 pawn for the past 10 moves. White had not improved his defense of that pawn for a while. Now that my rook faces Nd4, the Pe3 is that much more vulnerable, especially in a sequence where Be7-g5xe3 lands with check. In my usual language, I was going to try to remove the Pe3 guard of the Nd4.

As I understand Temposchlucker's terminology, e3 is a Point of Pressure (PoP) as is d4. Lines of Attack (LoA) include h6-e3 and d8-d4. The Nd4 is a Barely Adequately Defended (BAD) piece, but I would also like to label the Pe3 and Black's Pc6 and Pf5 as BAD. In addition, Pe3 is already immobilized and blockaded by Black's Pe4, but a functional immobility also exists in that the Nd4 is only defended by Pe3. With these critical items in play, White missed chances to bolster the e3-d4 problems and decided to press his queenside pawn majority with 25.a4. Of course, I played 25...Bg5 and my opponent sank into a long think. I felt somewhat confident at this point and walked around the club. I came back after 26.Kh1.

This shouldn't have surprised me, but it did. Kh1 comes close to solving White's problems. Sometimes if you have to lose material and time, the solution is to quickly concede what you have to concede and move onto getting something in return. Black will capture Bxe3, but White will follow with Nxc6, making the queenside majority scarier and temporarily threatening a Nxd8 win of the exchange. Now that I saw White's plan, it was my turn to concede something and try to gain something in return. I could see that Rd2 might be a devastating blow if I could camp heavy pieces on White's second rank. So I decided to go down this variation. 26...Bxe3 27.Nxc6 Rd2.

At this point, I worried about White's offensive possibilities. 28.Ne7+ is a move. Can Black counterattack with 28...Kf8? I decided, correctly as verified afterward, that 29.Nxf5 threatening Black's queen and a discovery on Black's king were too dangerous, so I was going to have to play 28...Kh8. Because of the balance between pieces en prise at Be3 and Nc6, White probably felt he had to keep his queen in contact with Be3. Also, it was difficult to see past 28.Qc4+ Be6 because you have to look extra ply ahead while the queen is attacked, but 29.Ne7+ Kh8 30.Qxe4 would have smashed Black's center and brought the Nc6 back into the protection of the Bg2 and Qe4.

After Qc4+ Be6 Ne7+ Kh8, the lines of attack (LoA) are c4-g8 and f1-f8. The Rf8 is a BAD piece as is the Pe4 (both are also on Points of Pressure, PoP).

Instead White played the passive 28.Qe1.

Here I thought for a long time on how to proceed. I was fixated by the looseness of my Be3 and his Nc6. I didn't want to trade evenly since my Be3 was quite strong as an unopposed bishop slicing into White's position and supporting eventual passed pawns. I soon noticed that the Nc3 was also loose and tried to limit the mobility of the Nc6 by playing 28...Bg5. Now that the bishop is safe, Qxc6 is back on and Ne5 runs into Bf6 skewering two knights on the diagonal.

But what I failed to appreciate was that Rd2 had given me a significant Line of Attack on PoPs g2 and h2. Plus my queen which had been at h6 for the past 15 moves had another serious Line of Attack against PoP h2. Add this to the already existing LoA against the BAD Nc6, and the limited mobility of White's King because of Be3 and I could have increased my chances of finding the brilliant 28...Rf6!! This move looks like it only increases the pressure on Nc6, but what it really does is threaten checkmate. White staves off mate with 29.h4 Rxc6, but has to soldier on a piece down. If he saves his knight, e.g. 29.Na5 or even 29.Ne7+ Kf7 30.Nxc8, there comes the shocking 29...Qxh2+ 30.Kxh2 Rh6#.

I emerged from the middle game with 2 extra pawns and converted them to victory.

Saturday, February 18, 2017

Stalemate Swindle

Frenez, one of my three readers, requested that I show a recent tournament stalemate. I was totally busted playing white against an 1800 player. The moves are not cleverly hidden like in Kubbel's studies; in fact, they're natural and obvious. White to play and draw:

69.b7! Qc7 70.b8=Q! Qxb8! stalemate! To my memory, this is the only one of my 540+ tournament games that ended in a complex stalemate. Now that Frenez has gotten the stalemate, I'm going to go in reverse chronological order like my Memento series and go over some of the crucial moments of this game. Feel free to change the channel when I get long-winded. I almost resigned this game prematurely. In the above diagram, I could see that b7 was going to be followed by Qc7, but Ka7 was going to be met by Qxa5+, so my only other option was to give up the b-pawn which was my only hope, but I hardly considered stalemate until I was one ply away and saw that it succeeded in giving me the draw. Notice that the Black King is at e6, blockading my passed pawn and preventing it from moving - we'll visit this later. The above diagram is already approximately equal. After 69.b7, Black has no real alternative to 69...Qc7 except perpetual check starting with 69...Qc6+ 70.Ka7 Qc7 {pinning the queening pawn} 71.a6 d4 72.Ka8 {unpinning} Qc6 {repinning} 73.Ka7, etc. Black blew the win one move earlier in the following diagram with Black to play:

Almost everything wins, EXCEPT 68...Qc5?, e.g. 68...Kd7 leads to mate in 8, 68...Qb4 leads to mate in 9, 68...Qb2 leads to mate in 10, the greedy 68...Qxe5 leads to mate in 10, and even the dithering 68...Qc4+ leads to mate in 10 as long as the follow-up is the approach of the Black King.

But before that, White blew a securely drawn position with some chances to swindle a win (white to play):

The moves just prior to arriving at this position were 59.f4 Kf7. I had realized that with my pawn back on f3, e5 was dangerous for me because of the way it can spring the d5 pawn free for a queening race. Unfortunately, playing 59.f4 and locking a bead on the hole at e5 made me think that e6-e5 had been prevented forever. It had not. With sober reflection on information that I definitely had access to, I could see that playing Kd7, Kd8, Kd7, and Kd6 would secure the draw for me. The e-file squares - e6, e7, and e8 - are crucial to White's winning chances and if he stays in contact with them, any variation that Black initiates with ...e5 fxe5 f4 e6 will probably end badly for Black because the e-pawn will likely check the Black King on the way to e8, giving the new White Queen time to execute the upstart Black Pawn on f2. With more sober reflection, I should have been more patient here and tried to advance my queenside pawns. 60.a4! is one move away from a winning position. However, if Black also reflects soberly, he can realize that e5 loses, and blockading my queenside pawns can secure a draw for him also. 60.a4! a5! 61.Kd7 Kf6 is drawn as is 60.b4 b5! 61.Kd7!= If somehow Black doesn't see the danger, then the variation 60.a4 Kf6? 61.a5! Kf7 62.b4 Kf6 63.Kc7 is won for White. e.g. 63...Ke7 64.Kxb7! e5 65.fxe5! f4 66.b5! axb5 67.a6! f3 68.a7 f2 69.a8=Q f1=Q 70.Qa6! Qc4 71.Qf6+! Kd7 72.Qd6+! Ke8 73.e6! initiates checkmate in 6 moves. If after 70.Qa6!, Black tries to hold with 70...Qf5 71.Qd6+ Kf7 72.Qxd5+ also keeps White's winning chances alive. Going back to 60.a4!, one last bit of interesting subtlety is that 60...b6 61.b4 Kf6! 62.b5 axb5! is still drawn albeit precariously.

At this point, my greed for pouncing on the queenside pawns made me impatient and I played 60.Kc7?? e5! 61.fxe5 Ke6. Note that Ke7 would have also prevented White from queening and also gives White a move if stalemate is a problem. Black correctly calculated that given a chance with 61...f4? White would have played 62.Kd7! and White is back from the dead and winning, e.g. 62...f3 63.e6+ Kg7 64.e7 f2 65.e8=Q f1=Q 66.Qe5+ Kf8 67.Qb8+ Kg7 68.Qxb7 and White is +4.0 in Stockfish's evaluation. For continuity, the moves that got us to the pivotal checkmate or stalemate position above were 62.Kxb7 f4 63.Kxa6 f3 64.b4 f2 65.a4 f1=Q+ 66.b5 Qc4 67.a5 Qxd4 68.b6

One more bit of shoulda-coulda. From the above diagram, rewind the game another 10 moves and we arrive here with White to make move 50:

Material is equal. Black's e-pawn is backward. White's h-pawn is passed. The crucial idea that I missed was that my h-pawn is vulnerable if it runs too far ahead, but if I centralize my White King, the h-pawn can be a valuable distraction. To that end, 50.Ke3! was a priority to prepare for a possibility of 50...Nf6? 51.Bxf6 Kxf6 52.Kf4 with winning advantage. Because of safe, time-wasting moves like Rh1-h2 and back, White can eventually zugzwang Black's king and or rook to allowing h5-h6, h6-h7, and Kf4-e5. Instead, I finally pushed back this troublesome knight on e4 and played 50.f3 Nf6. Here, 51.Bxf6 Kxf6 52.Ke3 Kg5=. The game went 51.h6 Ng8 52.Bf4 Kg6 53.Ke3 Nxh6 54.Rxh6+ Rxh6 55.Bxh6 Kxh6 56.Kf4 Kg6 57.Ke5 Kf7 58.Kd6 Kf6 59.f4 Kf7 and we meet the above "drawish" position.

Wednesday, November 16, 2016

SARGON

After using the search box above, I was surprised to find that none of my posts seems to have ever mentioned SARGON which seems to have been named after Sargon the Great, first ruler of the Akkadian Empire. Incidentally, the Scorpion King played by Dwayne Johnson supposedly arises from the remnants of the Akkadian tribe. I myself didn't play against SARGON, since our family had an Atari computer, but the Atari version has no eponym, so I decided to go with the winner of the first computer chess tournament. At the end of the 1982 Tron movie, the Master Control Program is defeated and he looks like an old man, implying the MCP was layered on top of a core computer chess program. In 6th grade, I played chess and even went to the state chess contest where I placed around a tie for 2-3. In 7th grade, I discovered computers and pretty much gave up chess until college. During the early years of computing, Atari Computer Chess on mere level 3 would be me so consistently that I rage quit chess. These days I have a Kindle with AI Factory's Chess Free on it. At maximum level 12, it is tactical enough that I have to be careful, but the opening book is not so good and there is definitely a horizon effect, so I can find and exploit its weaknesses. Here is the first time I beat it on maximum Level 12. The game is brief enough that following it on your blindfold board could be a nice exercise.

1. e3 {Van't Kruijs Opening} e5 2. Qh5 Nc6 3. Bc4 d5 4. Bb5 Bd6 5. Bxc6+ bxc6 6. Nc3 Nf6 7. Qd1 O-O 8. Nge2 a5 9. O-O e4 10. d3 {If you have never read The Art of Attack in Chess by Vukovic, I highly recommend the chapter on the Classic Bishop Sacrifice. Vukovic analyzes game after game with the standard piece placements and some variations to make the Greek Bishop sacrifice a success. I have only finished one tournament game that had this combination in it though. But it is the stuff of chess artistry that draws us to the game.} 10...Bxh2+ 11. Kxh2 Ng4+ 12. Kg3 Qg5 13. Na4 Nxe3+ 14. Kh2 Qxg2#

Take that, chess computer!

Monday, November 7, 2016

Staider

I'm a sucker for space drama. Recently, I find myself watching and rewatching "Interstellar" and "Gravity". But the original space drama was probably 1968's "2001: A Space Odyssey" directed by Stanley Kubrick. I had watched it as a highschooler and found it quite confusing with long artsy sequences bereft of dialog. When it arrived in my streaming pile a year ago, I tried to watch it again, but Strauss' "Blue Danube" coupled with the slow cinematics put me to sleep about halfway in. This picture is a key moment where HAL9000 eavesdrops on the astronauts plotting against him by reading their lips. Checkmate.

A couple days ago, I resumed watching 2001 and ran into the chess sequence around 1:06:06 where astronaut Frank Poole is playing the ship's computer HAL9000. It's laughable how bad Frank's position is. His queenside is untouched and his queen is the only active piece.


FRANK: Queen takes pawn.(Qxa6)
HAL: Bishop takes knight's pawn.(Bxg2)
FRANK: What a lovely move. Uh, rook to king one.(Re1)
HAL: I'm sorry, Frank, I think you missed it. Queen to bishop's three (Qf3). Bishop takes queen (Bxf3). Knight takes bishop, mate (Nxf3#).

Right after the chess scene, there is a scene in which Dave Bowman is drawing on a sketch pad while walking past cryochambers. The music sounded darned familiar. I googled my hunch and found that someone else noticed that perhaps James Horner "borrowed" music for the opening 2 minutes of "Aliens" from Alex North of "2001." Perhaps this was not so much plagiarism but homage since cryochambers are present in both scenes.

A while back I had a dalliance with Scrabble. At one point, I was trying to memorize various 7-letter combinations, the rack-emptying "bingo" plays that garner 50 bonus points. Scrabble players like to memorize based upon alphabetically arranged tiles:

    ADEIRST permutes into:
  • ARIDEST
  • ASTRIDE
  • DIASTER
  • DISRATE
  • STAIDER
  • TARDIES
  • TIRADES

I had a mnemonic of a story: In the ARIDEST desert, ASTRIDE his horse, the cowboy regarded this two-faced boomtown in the midst of DIASTER: a raucous DISRATE downtown and a sleepy STAIDER uptown; he dared not pause long as his TARDIES tended to provoke TIRADES from his boss.

My last rated game was a staid draw. Here is the final position (black to play):

In an earlier position, I tried to analyze the tactics and felt rust (black to play):

25...Nf4 26.Nxf4 exf4+ 27.Bd4 Bxd4+ 28.Kxd4 Ne6+ 29.Kc3. After the combination was over, I was disturbed to find an inaccuracy in my analysis. I had thought that Ne6 was necessary to prevent Nxf4 on the next move, but the knight at e2 is gone and the one on f2 needs one tempo to attack it. "I've just picked up a fault in the AE35 unit. It's going to go 100% failure in 72 hours." I chose this quote for the fault part referring to my visualization skills, not for what happens in real life about 72 hours from now. I'm trying to marshal some resources regarding the stepping stones method recommended by a friend from GM Jonathan Tisdall's "Improve Your Chess Now." I guess it's back to the drawing board to plug a hole in my opening repertoire and perhaps begin doing regular tactics again at Chess Tempo.

Tuesday, September 20, 2016

Practical Rook Endgames 16: Sack the Waterboy

The 1998 Adam Sandler football movie "The Waterboy" ended with a halfback option play. Sandler, the lowly waterboy turned punishing linebacker switches to offense and throws the winning touchdown pass to the quarterback. Sorry I spoiled it, but you had 17 years to watch it.

Theoretical generalizations seem to say that R2P versus R endings with a bishop and a rook pawn are drawn if the pawns are on the same side of the board and won if the pawns are on opposite sides of the board. After a seesaw game, I had the stronger side of the same-side ending but managed to find a way to win. This depended upon my opponent choosing the wrong time to ignore the weakness of my bishop pawn. I'm barely scratching the surface of this ending, but I thought I would share this position and its critical moment:

For the purposes of the Waterboy analogy, the f-pawn is the waterboy, the white king is the offensive quarterback, the white rook is the center or offensive line, and the black rook is the pass rush. White has just played 67.Rf6, so it's Black to move. I'm not sure why I put my rook on f6, but I think that I wanted my king to be able to lose contact with the f-pawn. My plan here was to move my king to e7 and perhaps block a Re1+ with Re6 and then try to queen the pawn. 67...Rg1+ 68.Kf4 Rf1+ 69.Ke5 Re1+ 70.Kd6.

Black to move. Here Black has to decide whether to chase the king further with 70...Rd1+ and live with 71.Ke7 or prepare some other way to get drawing chances. Actually, Rd1+ is still drawn and my opponent's choice is still okay to draw. 70...Ra1. Preparing lateral checks. The white king at this moment has no shelter from checks on the 6th, 7th, or 8th ranks. So I decided to create shelter. 71.Re6.

Black to move and draw. A critical moment has arrived. The two moves that can draw are slightly difficult to spot. 71...Ra5 and 71...Rf1 maintain tablebase draws. All other moves lose. Sample lines are: 71...Ra5 72.Re5 Ra4 73.f6 Kxh6 74.Ke7 Kg6= and 71...Rf1 72.f6 Kxh6! 73.Ke7 Kg6! 74.Re2 Ra1/b1! with lateral checks to hold. Unfortunately for my opponent, he didn't recognize that it was time to sack the waterboy. Instead, he followed my quarterback downfield to where I wanted to receive the Hail Mary pass and queen the f-pawn. The remaining positions are all tablebase wins for White. 71...Ra6+?? 72.Ke7! Ra7+ 73.Kf8! Ra5 74.f6! Ra8+ 75.Re8! Ra6 76.f7 Kxh6 Kg8! and Black resigned.