Sunday, December 25, 2016

Convergent Invisibility

I would say that it began with my discovery that Temposchlucker was actively blogging again. It was frustrating over and over again to see our failures as being unable to see the invisible, which is like a tautology: if we had seen it, it would have been visible. I had been casting about for self-improvement measures. iChess sent a promotional free video lesson from GM Daniel Naroditsky, to whom I once had the pleasure of losing a game when he was rated a mere 2256. The video captions his lecture with "GM Daniel Naroditsky, FIDE 2646". The catch line for the lecture was "How to be a Tactical Beast". He spent most of the time separating tactics into two branches - simple and complex - and then recommending resources for studying both. Then he walked through about 10 exercises from a chess server with pointers on how he would train. I came up with this outline of his resource recommendations:

Naroditsky's Recommended Tactics Resources:

  1. Simple Tactics
    1. Online
      1. Chess.Emrald.net - simpler tactics with time pressure
      2. Chess.com - tactical trainer with time pressure
    2. Books
      1. Invisible Chess Moves - Neiman, Emmanuel & Afek, Yochanan
      2. Understanding Chess Tactics - Weteschnik, Martin
  2. Complex Tactics
    1. Online
      1. ChessTempo - gold standard, but strays into complex tactics
    2. Books - Dvoretsky anything
      1. Dvoretsky's Analytical Manual
      2. Recognizing Your Opponents Resources

The word "Invisible" caught my eye. Yes, yes, teacher. Show me how to see the invisible. So I have embarked - as I have many times before - to try to work through a body of tactics within a book. I'm sort of looking at both of the highlighted books above. My method is to set up the position in ChessBase with the engine off, try to solve it by myself. And then read the book notes and see the engine analysis for a check. When I'm finished, perhaps I'll have a unique file that is like the e-book companion to the text. I looked at Temposchlucker's blog today and, after a break between Labor Day and Thanksgiving, he has posted about a dozen times in the past month.

It's a little early for resolutions, but I'm trying to get some modest mileage out of chess this year. Here are a few goals:

  • Try to have fun
  • Enjoy chess at our club
  • Sharpen my tactics
  • Sharpen my openings
  • Play in a weekend tournament

For now, I'm staying away from performance-based accomplishments because they tend to burden me with a feeling like chess - supposedly a fun hobby - is sometimes a tedious chore. So no ratings targets and no tournament win targets. Aside from Invisible Chess Moves, Understanding Chess Tactics, and Chess Tempo, I am also looking at A.J. Roycroft's The Chess Endgame Study, Kubbel's 150 Chess Studies, Nunn's 1001 Deadly Checkmates, and Volokitin's Perfect Your Chess. I also began to look at QvR endgames again to try to get a handle on semi-perfect play.

Monday, December 19, 2016

Doomed Fortress

Sigh. No London Chess Classic videos today. The last 10 days had an extra motivation to get up and watch video coverage of chess on the internet with the St. Louis Chess Club coverage of the London Chess Classic round robin among the world's elite chess players. That all ended yesterday with Wesley So winning the tournament and the tour. The stories of the tournament were So's solid play (+3-0=6) taking advantage of the chances that 2800-rated players give you. Nakamura's up-and-down performance (+3-2=4) and Topalov's down-and-down performance (+1-6=2). Even though the Najdorf is too deep for me, it was fun to see the theoretical battles in Caruana-Nakamura, Nakamura-Vachier-Lagrave, Anand-Vachier-Lagrave, and Anand-Giri.

One topic that was prominent in the middle of the tournament was the concept of endgame fortresses. Anand had apparently saved some incredible draws in previous tournaments. One of the games that Topalov lost was with Nakamura. On the time control move 40, with about 1 minute left, Nakamura blundered away a winning position with Black to play:

White is under massive pressure with Black's heavy pieces on his second rank. However, White's rook and bishop are barely holding the castle doors. White needs one more man to turn the tide and it turns out that 40...e4! is just what he's looking for with a -3.4 evaluation. Instead, Nakamura chose to get initiative on the h2 weakness with 40...Qh6? Now Topalov had his whole second time control to find the defense 41.Rb4! The nasty, nasty point of it is not just to gain useful moves such as Rb4-e4, but if Black somehow gets greedy with 41...Qxh2?? 42.Rh4! Qxg3 43.Rg4+ turns the tables.

Instead, Topalov played 41.Kg2?? and this time Nakamura did not fail to find 41...e4!. Topalov recognized the danger to his position and only now moved his wayward rook 42.Rb3 Qe6 43.Re3 exf3+.

Topalov continued 44.Kxf3 Qh3 45.Rd1 Qh5+Nakamura used the open lines to win the h- and g-pawns and drove Topalov's king to d3 whereupon Topalov resigned. GM Alejandro Ramirez, analyzing the above position with the help of engines, implied that a fortress might have been available to Topalov. Topalov has to purposely lose his bishop with 44.Rxf3 Rxe2+ 45.Rxe2 Qxe2 46.Rf2:

Black's pawns on h2 and g3 should provide some shelter against Black's shattered h- and f-pawns. Since there are too many men for tablebases, I cannot say with certainty whether this is truly unwinnable by Black, but it has some potential.

Wikipedia has an article on chess fortresses. The weaker side has a material deficit which should be losing, but because of the way the pieces are situated, the stronger side has no decisive breakthrough. Wikipedia cites bishop plus wrong rook pawn against lone king in the corner as a fortress position. I wonder if the basic drawing positions of KPvK fall under a loose definition of fortress. I am more intrigued by chess fortresses that actually have walls. My most fundamental example would be, with White to move:

Again, my favorite online resource with positions under 7 pieces is the Shredder Endgame Database. Indeed, you can set up your own experiments and see that even with Black's rook in the least active spot and with White on move, this position is a draw with best play. Black will aim to put his rook on f6 to keep the White King away from g7 and then from behind the wall, with enough shuffling space between g8, h8, and h7, Black's king can taunt the enemy at the gates forever (or at least for 50 moves).

Back to Topalov-Nakamura, I tried to defend the above position against Fritz 8 and couldn't fend him off. Black has four resources that are difficult for White to avoid:

  • If Black can win the rook and g-pawn for the queen, he should win. I was able to do this against Fritz simply by putting my Queen on e5, the pawn on f5, and bringing my king up to g5. White left his rook on f4 and let me trade.
  • Black can advance his h-pawn to h4 and with the threat of h3, the shattered pawns provide little shelter for the king
  • To hinder h5-h4, I tried h2-h4, trying to lock the pawns into a wall. This time Black broke through by placing his king at e6, keeping the white king at g2, and straight trading queen for rook on f4 and racing the king to a winning spot on d4
  • The queen can be quite annoying. If Kg2, then Q occupying the a8-h1 diagonal presents a problem. If White walks into a pin with Rf3, the only way to unpin is Kf2 and rook moves. Black can then play Qh1 getting into White's weak h-pawn.

So probably Topalov's fortress after 44.Rxf3 would have been doomed. However, in the absence of a refutation, I think 41.Rb4 would have held. A fascinating exercise is to use the Shredder Database to try shifting the rook-and-pawn fortress closer to or further from the corner and seeing if the game is still drawn with best play. Usually the fortress falls if the queen can get into the back side of the fortress and drive the king out into the open, so too much space is bad for fortresses. But if the king doesn't have enough space to shuffle back and forth, the fortress can also fall. Goldilocks wants a fortress that is not too cozy and not too drafty, but just right.

As I understand history, fortresses protected the stationary farmers from being driven off their productive land by invaders, but once those invaders started using cannons, fortresses became obsolete.

Wednesday, November 16, 2016

SARGON

After using the search box above, I was surprised to find that none of my posts seems to have ever mentioned SARGON which seems to have been named after Sargon the Great, first ruler of the Akkadian Empire. Incidentally, the Scorpion King played by Dwayne Johnson supposedly arises from the remnants of the Akkadian tribe. I myself didn't play against SARGON, since our family had an Atari computer, but the Atari version has no eponym, so I decided to go with the winner of the first computer chess tournament. At the end of the 1982 Tron movie, the Master Control Program is defeated and he looks like an old man, implying the MCP was layered on top of a core computer chess program. In 6th grade, I played chess and even went to the state chess contest where I placed around a tie for 2-3. In 7th grade, I discovered computers and pretty much gave up chess until college. During the early years of computing, Atari Computer Chess on mere level 3 would be me so consistently that I rage quit chess. These days I have a Kindle with AI Factory's Chess Free on it. At maximum level 12, it is tactical enough that I have to be careful, but the opening book is not so good and there is definitely a horizon effect, so I can find and exploit its weaknesses. Here is the first time I beat it on maximum Level 12. The game is brief enough that following it on your blindfold board could be a nice exercise.

1. e3 {Van't Kruijs Opening} e5 2. Qh5 Nc6 3. Bc4 d5 4. Bb5 Bd6 5. Bxc6+ bxc6 6. Nc3 Nf6 7. Qd1 O-O 8. Nge2 a5 9. O-O e4 10. d3 {If you have never read The Art of Attack in Chess by Vukovic, I highly recommend the chapter on the Classic Bishop Sacrifice. Vukovic analyzes game after game with the standard piece placements and some variations to make the Greek Bishop sacrifice a success. I have only finished one tournament game that had this combination in it though. But it is the stuff of chess artistry that draws us to the game.} 10...Bxh2+ 11. Kxh2 Ng4+ 12. Kg3 Qg5 13. Na4 Nxe3+ 14. Kh2 Qxg2#

Take that, chess computer!

Monday, November 14, 2016

Octopus

I grew up in the days after Sean Connery, so Roger Moore was my 007. It's strange to see such an enduring character through so many decades. The movies tend to blend together: add one megalomaniac, some femme fatales, big stunts, unusual vehicle chases, and of course, large explosions and you've got a formula for something. The latest installment named Spectre for a many-tentacled crime organization starred Daniel Craig with familiar faces Ralph Fiennes (The English Patient, Harry Potter series) as M, Monica Belluci (Matrix Reloaded) as widow Sciarra, and Andrew Scott (Sherlock) as C. As a piece of octopus evolution, the diagram above was found on a movie site discussing the logo. Perhaps Spectre was a ghost which evolved into an octopus and then into a septopus.

Piece auras are a parallel processing way to think about chess pieces and the force they exert. I once thought of chess pieces as one-dimensional vectors that existed only while I was looking at them, but eventually, I came to see that the aura of a bishop is a diagonal X, the aura of a rook is an orthogonal cross, the aura of a king is a 3x3 square, and a queen's aura is the combination of bishop and rook, an asterisk? Even though the queen's aura is 8-armed, the knight's aura is the one usually likened to an octopus.

This is Chess Tempo #44631. White has just played a2-a3 to shoo away the black queen. One thing to note is that the Nb3 is supported by the pawn on c2, pinned by a black rook battery against white's queen. Further, the white queen and rook are the only pieces on the back rank where the white king would have no escape at the moment. Black's pawns seem too far away to exert any initiative. The black bishop doesn't seem to have any targets. The black knight on e4 is held by the Rc4 laterally and can attack the white Bg3. Further, the rook on e2 is a juicy prize in that it's undefended and it sits on the square of a royal knight fork. From this analysis, I had Qxb3 and Nxg3 as my candidate moves. Now comes the process of calculating forward into the future. Lines: Qxb3 cxb3 Rxc1 Rxc1 Rxc1+ Re1 Rxe1 mate. Qxb3 cxb3 Rxc1 Ree1 - Black is ahead by a minor piece, so he must do better. Qxb3 Rxe4 {distraction} Rxe4 cxb3 Rxc1 Rxc1 - material is even. Qxb3 Rxe4 Rxc2 - Black gained a pawn, White must move his queen. Or maybe there's a hook-and-ladder trick} Re8+ Rxe8 {white queen still en prise and can't capture c2}. So back to Rxc2, maybe Black has more initiative to pursue the back rank mate? CONCLUSION of Qxb3 lines: White can win a pawn and gain initiative on the back rank.

What about Nxg3? Nxg3 axb4 Nxe2+ Kf1 Nxc1 Rxc1 - Black is ahead by a whole rook. Nxg3 hxg3 Qxb3 - Black is ahead by a minor piece. What about hook-and-ladder in this position? Nxg3 hxg3 Qxb3 Re8+ Rxe8 cxb3 Rxc1 Rxc1 - here I think I miscalculated and thought material was even. The Re8+ move didn't gain any knight, but because it had in the line of Rxe4, I thought white had equalized in material. The pieces on the board don't bear that out as the Bg7 is the only minor left. I forgot to check start material and in my mind, somehow, White gained a knight he didn't gain. So I chose Qxb3 and got this problem wrong. Tools: Knight forks, Hook-and-Ladder tricks. Root cause: Losing track of material.

This is Chess Tempo #97479. White has just advanced b2-b4, creating a problem for his Ra1. 1...e4 creates a double attack against Bf3 and Ra1, but 2.dxe4 creates tactical possibilities for White's queen. If 2...Qxa1 3.Qxd7 and White threatens to take the Bf7 or the Pf5 with check while holding d1. At this point I looked for the knight to run and the f3 knight fork looked really good, so 2...Ne5 was the next move. I hadn't looked too carefully and didn't anticipate 3.Qxf4, but 3...Nxf3+ 4.Qxf3 Qxa1 seemed to provide for a durable material advantage. White can try to get a third pawn for the rook with 5.Qxf5+ Bg6 6.Qd7+ Rg7 7.Qd2 but 7...Rd8 brings him to grief because of the weak position of Nd1. Tools: Knight fork, discovery, skewer, consolidation. Root cause: Didn't get it wrong, but should have checked Qxf4.

This is Chess Tempo #165523. I got this one wrong. I spent a lot of time trying to crack open the Black king castled position. Whenever I analyzed h6, I saw g6 with tempo on my queen and pruned the variation. I didn't think to use a broader vision to look at the arrangement of d7 and g8 for a knight fork pattern using Qxd7 and Nd5-f6+. That's the secret to this problem. 1.h6 g6 2.Qxd7 Qxd7 3.Nf6+ Kh8 4.Nxd7. Tools: Knight fork, distraction, pawn lever. Root cause of miss: Failed to see how powerful Nd5 was and how juicy Nf6+ would be.

Sunday, November 13, 2016

Bludgeon

Recently, I was lucky to visit Rome, Italy, where I toured the Vatican Museum on my way to view the Sistine Chapel. The collection included many images of Greek gods and demigods. The figure of Hercules was easily recognizable by a trademark huge club.

A few days ago, while browsing Amazon Prime, I came across the 2014 movie "Hercules" starring Dwayne Johnson (Scorpion King, Journey to the Center of the Earth). Other faces I recognized included Rufus Sewell (Dark City) as Autolycus, Joseph Fiennes (Shakespeare in Love) as King Eurystheus, Rebecca Ferguson (Mission Impossible: Rogue Nation) as Ergenia, and Christopher Fairbank (The Fifth Element) as Gryza.

Here's a segment of dialog I found amusing:
Iolaus: (showing armor) Linothorax. Hewn from the skin of the Erymanthean boar. It's indestructible.
Man in crowd: Wait. If it's indestructible, how did Hercules cut it off the boar?
Iolaus: He used an indestructible blade

I had previously blogged about this paradox in Juggernaut, but its presentation in a period fantasy made me look up the origins again. Wikipedia indicates some origin in the etymology of the Chinese word for contradictory (maodun) literally written as "spear-shield". In Western culture, Greek mythology has a neat story about the origins of Canis Minor representing the uncatchable Teumessian fox, and Canis Major representing the Laelaps, the infallible hunting dog.

In the many battles, Hercules does mostly use his club, but he uses all kinds of weapons. At one point, he tries to kill the Nemean Lion with bow and arrow, the epitome of finesse and precision compared with the artless bludgeon. Among analysis tools, sometimes brute force is necessary to understand what's going on. Going deep into a position and exploring at least one branch exhaustively is required to see the truth. This is hard to fight through, when laziness and a desire to trust intuition is no substitute for knowing.

Having seen some revival of Temposchlucker's blog, I asked myself the question "How does one see the invisible?". Or in the language of the humble chess student, "Teacher, teach me to see." I don't know that I have any insights, but I'm thinking of this question as I begin to train my calculating ability again on Chess Tempo. For that, I am reviving Wetzell's flash cards and here I'm trying to use the de Groot verbalization to understand how things fall on this or that side of the veil. Probably Dan Heisman has some didactic methods on this. I don't know how to train students. I am just trying to analyze and understand this chaotic mass of thoughts that course through my brain during a game. Maybe it will be useful to someone else.

Agony and ecstasy, breadth and depth. I was ecstatic to find the key to Chess Tempo #162374, but disappointed to miss the follow-up. The problem was depth and my tendency to prune a variation out of laziness or fear. When computers do their brute force, they line up all the first-ply moves and go through every single one of them, no matter how ridiculous. Depending on the algorithm, they evaluate this or that position at this or that time, generate scores and generally make a list with the best variations at the top of the list. Humans shouldn't try to emulate this, but Charles Hertan seems to be advocating for it in his book Forcing Chess Moves. Strong players are known to have great imagination but this is backed up by calculation and the ability to see quiet and unusual moves in the middle of calculation. In this diagram, I see that there is a big focal point on the knight at e5. When the knight is gone, there may be trouble from the Ba1 toward the Qg7. But then I saw that Black's bishops are zeroing in on another focal point at g2 and the white king's castled position. Nxf1 has the potential to threaten mate next move with Qxg2, but Qxf1 balances material and prevents mate. Around this time, I noticed that Ne2 is a royal fork if the Re1 didn't prevent it. Bxe2 sort of prevents the royal fork, but at the cost of Qxg2#. Aha! Maybe my first move is to distract with Rd1! Rxd1 Ne2+ Kf2 Nxf4 is big money (+4 queen for rook). Another good thing about Rd1 is that in the case of Ne5 moves, Qxa1 captures the bishop cut off from Re1. Buoyed by discovery, I played Rd1 without looking for White's next reply. Qc4 was not on my radar at all. If Rxe1 Qxe6+ Kh8 Nf7+ Kg8 Ne5+ Kh8 seemed like a draw, so I chose Bd5 to prevent it. Chess Tempo failed me. Another detail I missed was that now that the Ne2+ fork is not royal, White can play Rxd1 even though his queen is en prise. Bxc4 Bxc4 and material is close to even. I didn't even consider Qxe6+ Kf8. But even when I saw this, I thought Nd7+ Qxd7 Qxd7 was enough to reject it. One additional feature I hadn't factored in was to recognize how close Black was to a mating pattern. Qxd7 allows Rf1+ Kh2 Rh1#. The clogged bishop diagonals are hard to clear when the pieces are in fact gone. Tools: Brute Force, Distraction, Convergences at e5 and g2. Knight royal fork, Mate pattern with knight and rook. Distraction. Root cause of miss: Not recognizing imminent mate for my opponent. Not analyzing daring Kf8 and Qxd7, not recognizing mate.

It was not hard to try the Rxe3+. Forcing moves first. Checks are what we learn to play as children and it's what I usually do when I start calculating. The king can't take the rook since it's guarded by Qf2. What if Qxe3? There's a nice swallowtail mate with Qf5#. Rxe3+ played and correct. So the king is forced to run to d5. How to pursue? Qg2+ seems the only safe way. Played and correct. Queen can't block, so King has to run: d6, c5, and c4. If Kd6, we're going to need backup. The rook doesn't pull its weight back on e3, so probably Re6+. Played and correct. If Kd7 or Kc7, then Qc6+ followed by Re8 is mate. What about Re6+ Kc5? Qc6+ and my queen seems to block the rook from some prime checking squares. But if Rc6+ Kb5 and how do I keep checking while my rook is attacked (more later)? At this point, I concluded that after Re6+ Kc5 Qc2+ was the right way to go, but Chess Tempo gave me the try again message without failing me. Eventually, I came back to this variation and followed Qd5+. This short-distance check had somehow eluded me earlier. What about the variation after Qg2+ Kc5 or Kc4? Qc2+ forces him back the d-file or else White has the heavy roller with Rb3+ and Qa2 mate. Kd6 Re6+ Kd7 Qc6+ Kd8 Re8#. What about Qc2+ Kd5 Qb3+? Kc4 or Kc5 quickly come to grief with Rc3+ Kd6/Kd7 Qe6+ Kd8 Rc8#. Qb3+ Kd6 lasts a little longer Qe6+ Kc5 Rc3+ Kb5 Qc4+ Kb6 Rb3+ Ka5 Qb5# Long variations that I actually broke up during my answer to Chess Tempo. I felt that the long variations helped stretch my calculation muscles, so I had some desire to try to do the whole variation tree in my head from the start position. Tools: Brute Force, Swallowtail mate pattern. Root cause of difficulty: Had trouble spotting a short check.

This is Chess Tempo #152352. Black has terrible problems including an unsafe king at f7 and a loose bishop at c8. However, White needs to be careful because if simply 1...Qxc8 2.Qd1+ Kg2 Qf3+ secures a draw. White's bishop on b2 provides some chance of targeting g7 with a mating net, but variations don't seem to force that to work. 1...Qg8+ 2.Kg6 Rxh6+ goes nowhere and 2...Qh7+ 3.Kg5 seems safe. So the idea seems to be to win the bishop on c8 while avoiding a draw. 1...Rf8+ 2.Kg6 Qxc8 3.Qd1+ Kg2 and the Rf8 stops any perpetual. Tools: Brute Force, Consolidation

Here's Chess Tempo #92458. My concentration flagged after a few plies and I failed to see that a mate was possible. 1.Qh8+ Kf7 2.Qh7+ and Black must block with either bishop or knight. If 2...Ng7 then 3.Bxg6#. After 2...Bxg7 3.Bxg6+ Kf8 and I didn't know where to go next. So I guessed 1.Bxg6 and got it wrong. I forgot to back up and try 2...Bg7 3.Bxg7 Nxg7 4.Bxg6+ Kf8 5.Qh8#. Black can delay a bit with 3.Bxg7 e5 4.Bh6+ Ke6 5.Qxg6+ Nf6 6.Qxf6#. Root cause for miss: Failing to try the 3.Bxg7 branch. Tools: Brute Force.

Monday, November 7, 2016

Staider

I'm a sucker for space drama. Recently, I find myself watching and rewatching "Interstellar" and "Gravity". But the original space drama was probably 1968's "2001: A Space Odyssey" directed by Stanley Kubrick. I had watched it as a highschooler and found it quite confusing with long artsy sequences bereft of dialog. When it arrived in my streaming pile a year ago, I tried to watch it again, but Strauss' "Blue Danube" coupled with the slow cinematics put me to sleep about halfway in. This picture is a key moment where HAL9000 eavesdrops on the astronauts plotting against him by reading their lips. Checkmate.

A couple days ago, I resumed watching 2001 and ran into the chess sequence around 1:06:06 where astronaut Frank Poole is playing the ship's computer HAL9000. It's laughable how bad Frank's position is. His queenside is untouched and his queen is the only active piece.


FRANK: Queen takes pawn.(Qxa6)
HAL: Bishop takes knight's pawn.(Bxg2)
FRANK: What a lovely move. Uh, rook to king one.(Re1)
HAL: I'm sorry, Frank, I think you missed it. Queen to bishop's three (Qf3). Bishop takes queen (Bxf3). Knight takes bishop, mate (Nxf3#).

Right after the chess scene, there is a scene in which Dave Bowman is drawing on a sketch pad while walking past cryochambers. The music sounded darned familiar. I googled my hunch and found that someone else noticed that perhaps James Horner "borrowed" music for the opening 2 minutes of "Aliens" from Alex North of "2001." Perhaps this was not so much plagiarism but homage since cryochambers are present in both scenes.

A while back I had a dalliance with Scrabble. At one point, I was trying to memorize various 7-letter combinations, the rack-emptying "bingo" plays that garner 50 bonus points. Scrabble players like to memorize based upon alphabetically arranged tiles:

    ADEIRST permutes into:
  • ARIDEST
  • ASTRIDE
  • DIASTER
  • DISRATE
  • STAIDER
  • TARDIES
  • TIRADES

I had a mnemonic of a story: In the ARIDEST desert, ASTRIDE his horse, the cowboy regarded this two-faced boomtown in the midst of DIASTER: a raucous DISRATE downtown and a sleepy STAIDER uptown; he dared not pause long as his TARDIES tended to provoke TIRADES from his boss.

My last rated game was a staid draw. Here is the final position (black to play):

In an earlier position, I tried to analyze the tactics and felt rust (black to play):

25...Nf4 26.Nxf4 exf4+ 27.Bd4 Bxd4+ 28.Kxd4 Ne6+ 29.Kc3. After the combination was over, I was disturbed to find an inaccuracy in my analysis. I had thought that Ne6 was necessary to prevent Nxf4 on the next move, but the knight at e2 is gone and the one on f2 needs one tempo to attack it. "I've just picked up a fault in the AE35 unit. It's going to go 100% failure in 72 hours." I chose this quote for the fault part referring to my visualization skills, not for what happens in real life about 72 hours from now. I'm trying to marshal some resources regarding the stepping stones method recommended by a friend from GM Jonathan Tisdall's "Improve Your Chess Now." I guess it's back to the drawing board to plug a hole in my opening repertoire and perhaps begin doing regular tactics again at Chess Tempo.

Wednesday, September 21, 2016

TPS Report #19

I came into possession of a talisman, a touchstone that symbolizes my relationship with movies, with computer programming, and with rebelling against authority. Yes, I now have a red Swingline stapler similar to Milton's of "Office Space". I even filled it with staples even though I almost never staple things together at my desk. But I could, and that's what's important. Perhaps I will print these 19 TPS Reports, collate them into a stack, attach a cover sheet AND a memo, and staple the whole mess together, just for the fun of it. A strange sort of cognitive dissonance comes from watching myself imbue this inanimate object with magical properties. Why does such a mundane thing make me happy?

I have not been playing chess, but I have been going over my opening repertoire. I have not been training middle game tactics, but I have been annotating rook and pawn endgames. I have not been studying the games of masters, but I have been watching some broadcasts from the St. Louis Chess Club. I have not been going to the chess club, but I have been blogging about chess. It's like I am of two minds: one that is attracted by chess, and one that is repelled. Autumn tends to strengthen the pull of the chessboard on me. But I actively resist some of its basic trappings.

In tracking where my blog referrals were coming from, I found out that my old friend Temposchlucker started blogging again at the end of 2015 and went strong through every month in 2016, until August when his blog went dark again, temporarily or not. A key question seemed to awaken his passion for analysis: How does one see the invisible? Sometimes, I am surprised at what I see. It is as if my mind sees without the participation or consent of my conscious will. Neural networks, like the one used to beat the Go champion, use nodes to needle the network into producing an integrated result. Somewhere, I have neurons that fire faster when pieces are knight forks apart or related by bishop and rook pins. How do those neurons get their programming? Will Tempo or the knights or anyone else find that thing that trains the eye to see what it doesn't see?

I was somewhat inspired by the volumes of words produced by Temposchlucker and by another blogger on the "Path To Chess Mastery". But in the end, the proof is in the pudding. Can I train myself to be as good as a master? Is that even my goal any more? It is a question that seems more likely to be answered in the negative given my emotional momentum. A rejuvenation of my commitment to a younger man's goals seems unlikely. The expression is usually "Time will tell," but I wonder if it is more accurate to say "Time may or may not tell."

Tuesday, September 20, 2016

Practical Rook Endgames 16: Sack the Waterboy

The 1998 Adam Sandler football movie "The Waterboy" ended with a halfback option play. Sandler, the lowly waterboy turned punishing linebacker switches to offense and throws the winning touchdown pass to the quarterback. Sorry I spoiled it, but you had 17 years to watch it.

Theoretical generalizations seem to say that R2P versus R endings with a bishop and a rook pawn are drawn if the pawns are on the same side of the board and won if the pawns are on opposite sides of the board. After a seesaw game, I had the stronger side of the same-side ending but managed to find a way to win. This depended upon my opponent choosing the wrong time to ignore the weakness of my bishop pawn. I'm barely scratching the surface of this ending, but I thought I would share this position and its critical moment:

For the purposes of the Waterboy analogy, the f-pawn is the waterboy, the white king is the offensive quarterback, the white rook is the center or offensive line, and the black rook is the pass rush. White has just played 67.Rf6, so it's Black to move. I'm not sure why I put my rook on f6, but I think that I wanted my king to be able to lose contact with the f-pawn. My plan here was to move my king to e7 and perhaps block a Re1+ with Re6 and then try to queen the pawn. 67...Rg1+ 68.Kf4 Rf1+ 69.Ke5 Re1+ 70.Kd6.

Black to move. Here Black has to decide whether to chase the king further with 70...Rd1+ and live with 71.Ke7 or prepare some other way to get drawing chances. Actually, Rd1+ is still drawn and my opponent's choice is still okay to draw. 70...Ra1. Preparing lateral checks. The white king at this moment has no shelter from checks on the 6th, 7th, or 8th ranks. So I decided to create shelter. 71.Re6.

Black to move and draw. A critical moment has arrived. The two moves that can draw are slightly difficult to spot. 71...Ra5 and 71...Rf1 maintain tablebase draws. All other moves lose. Sample lines are: 71...Ra5 72.Re5 Ra4 73.f6 Kxh6 74.Ke7 Kg6= and 71...Rf1 72.f6 Kxh6! 73.Ke7 Kg6! 74.Re2 Ra1/b1! with lateral checks to hold. Unfortunately for my opponent, he didn't recognize that it was time to sack the waterboy. Instead, he followed my quarterback downfield to where I wanted to receive the Hail Mary pass and queen the f-pawn. The remaining positions are all tablebase wins for White. 71...Ra6+?? 72.Ke7! Ra7+ 73.Kf8! Ra5 74.f6! Ra8+ 75.Re8! Ra6 76.f7 Kxh6 Kg8! and Black resigned.

Saturday, September 17, 2016

Practical Rook Endgames 15: Vancura Caveats

Isaac Asimov's short story collection "I, Robot" was made into a 2004 movie starring Will Smith as Detective Spooner. I love the writing in spots and wish to highlight two segments: 1. Dr. Alfred Lanning's soliloquy in the middle of the movie which I have quoted in brief before:

There have always been ghosts in the machine. Random segments of code, that have grouped together to form unexpected protocols. Unanticipated, these free radicals engender questions of free will, creativity, and even the nature of what we might call the soul. Why is it that when some robots are left in darkness, they will seek out the light? Why is it that when robots are stored in an empty space, they will group together, rather than stand alone? How do we explain this behavior? Random segments of code? Or is it something more? When does a perceptual schematic become consciousness? When does a difference engine become the search for truth? When does a personality simulation become the bitter mote... of a soul?

The second passage is near the beginning when Detective Spooner compares his task to Hansel and Gretel:

SUSAN CALVIN: I don't understand. Alfred wrote the Three Laws. Why would he build a robot that could break them?
DETECTIVE SPOONER: Hansel and Gretel.
SUSAN CALVIN: What?
DETECTIVE SPOONER: Two kids, lost in the forest. Leave behind a trail of bread crumbs.
SUSAN CALVIN: Why?
DETECTIVE SPOONER: To find their way home. How the hell did you grow up without reading Hansel and Gretel?

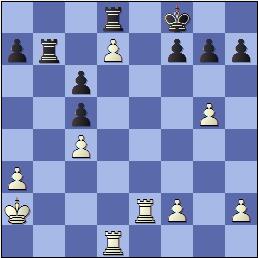
It's obvious to me that I really have a lot to learn about rook endings. The more I learn, the less I know. I didn't give any variations in my previous post because I thought that the Vancura was a shortcut to understanding how to draw the ending like an automaton. "Put your king on g7 and your rook on f6 and check, check, check your way to a draw." My one active reader commented and gave me a Vancura variation to chew on:

Black to move and draw. Since I am too lazy to work all the secrets out myself, I went straight to my favorite 6-man tablebase robot at the Shredder site and plugged in this position. I was surprised to find out that the path to a draw, far from a mindless template, was a bit more complicated. Actually, there are only two bread crumb trails that draw: A) Ra5 and B) Rc1. A) 1...Ra5 2.Ke4:

Here again, only two moves draw, but the pathways are convergent: C) 2...Rb5 3.Kd4 Rb6! (only move) and Black can look forward to moving his rook to f6 and checking until the draw comes home. D) 2...Rc5 3.Kd4 Rc6! (only move) with a similar Vancura pattern.

Going back to the previous diagram, here is the alternate way to draw: B) 1...Rc1 2.Ke5 Rc6! (only move) and we're back to familiar territory. Staying with the first diagram, I began the search for hypotheticals. Why doesn't 1...Rf1+ work?:

White to move and win. 2.Ke5! keeps White's winning path alive. Why can't Black just force the Vancura? It's tactically unsound here: 2...Rf6? 3.Rg8+! Kf7 4.Rf8+! The rooks come off and the a-pawn waltzes in. After Kf4-e5, if only Black could play Rf1-b6 or Rf1-c6, he would be on the true Vancura path. Let's try 2...Rf7.

White can still win. Shredder shows 5 moves to victory. The simplest is the pawn advance 3.a7. Black's rook is misplaced at f7. For the rook pawn on the seventh, the defender should be behind the pawn to prevent the attacker from just sacrificing his rook e.g. 3...Re7+ 4.Kd6 Rf7 5.Rg8+ Kxg8 6.a8=Q+. Continuing this White win variation, what if after 1...Rf1+? 2.Ke5 Black tries to draw with a spate of spite checks? White makes his way to sanctuary at a7 3...Re1+ 4.Kd5 Rd1+ 5.Kc5 Rc1+ 6.Kb6 Rb1+ 7.Ka7. With the defending king so far away, White reshuffles his rook to b8, king to a8, pawn to a7, then the White king moves out through b7, chases down the checking rook, and queens the pawn.

Going back to the beginning, I now asked Shredder, why does 1...Rb1? lose? Can't Black force Rb6 and find the way home?:

White to move and win. Shredder points out an unintuitive variation starting with 2.Ra7+!. White easily wins if Black goes to the eighth rank e.g. 2...Kg8 3.Rb7 Ra1 4.a7 followed by Rb8+ and a8=Q. 2...Kf6 is more testing. Now White has to avoid the drawing 3.Rb7? Ra1 4.Rb6+ Ke7!= but instead find 3.Ke4! Ke6 4.Ra8! It looks like White is going back to a previous position, but with the Black king away from his safe base of g7, more tactical checks come into play for White. I just realized that doing the shuffle is not always straightforward either and I'll probably have to devote a short post to the a6 pawn win.

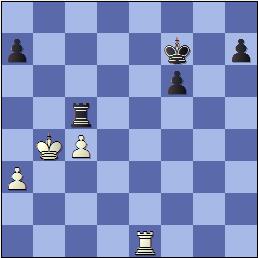
Why didn't this Ra7+ win work against B) 1...Rc1!=?:

Black to move and draw. Now Black has to find three narrow bread crumb trails E) 2...Kg6!= 3.Ra8 Kg7!= and F) 2...Kg6!= 3.Ke5 Rc6!= and G) 2...Kg6!= 3.Rb7 Rc5!= angling back toward the classic Vancura with Kg7 and Rf6. As you can see, the path with A) 1...Ra5 is much safer than B) 1...Rc1. Here is one more argument in A)'s favor:

Black to move and draw. This diagram has one subtle difference with the first one. The White king is now at f5. Black cannot draw now with 1...Rc1? because 2.Ra7+! Kh6 leaves his king just too far away to prevent the brute force plan of White moving his king to b8 and escorting the pawn in. 3.Rd7 Rc5+ 4.Ke6 Rc6+ 5.Rd6 Rc5 6.Kd7+. Instead, Plan A) still works against Kf5: 1...Ra5+! 2.Ke6 Rh5!. I know that I warned in the last post not to put the Black rook behind the Black king, but here it is necessary. 3.Ra7+ Kg8!=. 3...Kh8? and 3...Kf8 both lose to 4.Rf7! blocking the Rh6+ skewer. Black also has to know that after 3.Kd7 there's still time to get back to Vancura with 3...Rh6! 4.Kc7 Rf6! and Black is ready with checks even if 5.a7 Rf7+!=. 5.a7 Ra6? loses to 6.Kb7! Ra1 7.Rb8.

From the attacker's point of view, getting the king to e4 or e5 while the Black rook is on a1 wins even if Black is on move. With White on move from the last diagram, 1.Ke4 or 1.Ke5 lead to wins. Surprisingly, 1.Ke6? only draws if Black can find .1...Rh1!=. From the defender's point of view, his rook must be on a5 prior to White getting from the kingside to Ke4 or Ke5. From Shredder, I see now that if White can get Kd4 and Black has not gotten his rook to b6 or f6 (e.g. he still has his rook on a1 or a5), then Black is lost. So the speed at which Black can get the ideal setup with rook on f6 or b6 is crucial.

Whew! As my reader commented "The theory of rook + a-pawn versus rook is actually surprisingly deep, with lots of different techniques."

Sunday, September 11, 2016

Practical Rook Endgames 14: Vancura Candidate

"The Manchurian Candidate" was first a book in 1959 written by James Condon. It was made into a black and white movie in 1962 starring Laurence Harvey as war hero Raymond Harvey, Frank Sinatra as his superior officer Bennett Marco, and Angela Lansbury as Shaw's mother Eleanor Iselin. The plot revolves around a Communist ploy to brainwash American POWs of the Korean War and turn them into subconscious sleeper agents in a bid to seize the United States presidency. The brainwashing occurs in Manchuria. Angela Lansbury, who I know as a sweet old woman of the "Murder, She Wrote" TV series and the voice of the animated teapot in Disney's "Beauty and the Beast," really shocked me with her range as a vicious and conscious sleeper agent earlier in her acting career.

Down the cast list is Leslie Parrish who plays Shaw's love interest Jocelyn Jordan. She appears in the middle of the movie to demonstrate the significance of the Queen of Diamonds and how firmly held the brainwashing control is on Shaw. Leslie Parrish makes several intersections with my cultural life: She appears in the original series Star Trek episode "Who Mourns for Adonais?" as a crew member who beguiles the Greek god Apollo. Leslie Parrish also figures prominently in Richard Bach's love story novel "The Bridge Across Forever." During their romance, they play chess together and she eventually becomes his wife in real life. Unfortunately, the soulmate subject of the book is somewhat invalidated by the fact that the two eventually separated.

"The Manchurian Candidate" was remade in 2004 starring Liev Schrieber as Raymond Shaw, Denzel Washington as Ben Marco, Meryl Streep as Eleanor Shaw, and Vera Farmiga as Jocelyne Jordan.

Whenever I try to remember the gist of the Vancura position, I feel like I have been brainwashed. It just doesn't stick. This morning, I listened to a lecture given by GM Alexander Ipatov on the Vancura position and for now, I have some memory stickiness. Interestingly, Ipatov pronounces it "van-chur-a" while I always thought it was "van-cure-a". Ipatov introduces the position with this diagram:

The elements of Vancura are the following:

  • Material is RPvR.
  • The pawn is a rook pawn, specifically on its 6th rank, not 7th.
  • The attacking rook is usually on the rook pawn's queening square.
  • The defending king is on the opposite side of the board, preferably on his knight-2 or rook-2 square.
  • Vancura's classic position has the defending king on g7 and the defending rook on f6.
  • The attacking king is not yet touching the rook pawn.

Black's formulaic method to draw is to Plan A) check the enemy king from the f-file, especially when it touches the rook pawn, or Plan B) shuffle his rook between b6, c6, and f6 when Plan A does not seem viable. If the pawn ever goes to a7, then the black rook belongs on the a-file and the black king must stay at g7-h7. One caveat: Don't put the rook where it will run into your king on the g-file or get behind your king on the h-file. Other than dropping a rook or forgetting to check the king when it touches the pawn, drawing this ending doesn't seem too hard. The attacking rook should never leave the a-file because the a-pawn will immediately drop. The defending king should stay in contact with the square h7 so that the attacking rook can't skewer. Sometimes, the rook will check Ra7+. The king just moves to g6 or h6.

The reason this formation needs extra significance is that the weaker side can't always leave his rook on the a-file and draw, especially if the stronger king can make it to a7. If the pawn moves to a7 and the king moves to a8, then the weaker side has to run his king to c7 or c6 before the attacker can set up the winning formation with Rb8, Kb7, and Pa7. With Vancura, the defender earmarks the f-file for his rook to harass the enemy king from afar. There is basically nowhere to hide.

This method can probably be extended to the situation where the rook pawn is only on the fifth rank, possibly even earlier. This method also works to draw against an extra g- or h-pawn held by the attacker. The defender must be careful that he doesn't allow a free check with Rg8+ or something, so sometimes the extra pawn sits en prise at g5 or h5 with the defending rook just shuffling around.

Karsten Mueller wrote an article about Vancura after the 2014 Sinquefield Cup game between Carlsen and Aronian, quoting some spectator as saying "It is insulting that Aronian is not resigning." But Aronian used Vancura-like methods to get a difficult draw three pawns down. Carlsen's extra pawns were at a5, h6, and h3.

Sunday, May 15, 2016

Practical Rook Endgames 13: Tactical Flourish or Positional Bind

Iron Man 3 saw Guy Pearce join Robert Downey, Jr., Don Cheadle, and James Dale in a tag team battle between two Iron Men and two Extremis mutants.

It was fun to see a couple familiar faces. The U.S. President in Iron Man 3 is played by William Sadler, who played Heywood in "The Shawshank Redemption" and butchered reading the name of the author of The Count of Monte Cristo as "Alexander Dumbass". Also, the fake Mandarin is played by Sir Ben Kingsley, who played Bruce Pandolfini in "Searching for Bobby Fischer". Incidentally, a fellow club member who is a New Yorker pointed out that Pandolfini should have had a Brooklyn accent, yet Kingsley played him with an Irish accent. I found this article to explain how that happened.

This post is the fifth and final installment from a semifinal game from my 2015 club championship run. The game is broken into phases running - Memento-like - in reverse chronological order. I have chosen Guy Pearce movie mashups to try to solidify themes of the game phases.

In this fifth installment, we rewind the game another six moves to the point where it became a double rook ending. White to move:

White has a dangerous passed pawn on d6 and the white rooks seem well placed to make it strong. The black rooks are struggling to prevent the pawn from queening and also defending against back rank mates. The white king is pinned against the a-file for now. The most forcing variations would be to queen by force and checkmate or win a rook. Such a variation doesn't exist. However, my opponent hallucinated a promising tactical flourish. Unfortunately for him, the variation he saw was not forcing and it allowed me to gain counterplay. The game continued 32.d7 Rfd8 33.Rb1?

Black to move. My opponent confidently went to the smoking area outside the club and expressed some happy words of confidence. If 33...Rxb1?? 34.Re8+ Rxe8 35.dxe8=Q or =R mate. Similarly, 33...Rxd7?? 34.Rxb8+ Rd8 35.Rxd8 mate. So I obviously should reject those two variations. If Black plays an indifferent move like 33...h6? to create some breathing room for his king, White still has 34.Rxb8 Rxb8 35.Re8+ Rxe8 36.dxe8=Q+. The Re8 variations can be neutralized by simply 33...Kf8! and now Black threatens to take at b1 and then on d7 when White would have nothing. Similarly I could see that with my king now only one step from Ke7 to support Rxd7, the advanced passer was not going to decide this game. White avoided the exchange of rooks with 34.Rd1 Rb7

Stockfish calls this a dead draw. If White decides to hold onto the d-pawn, 35.Red2 Ke7 36.Re1+ Kf8 37.Red1, he'll probably have to settle for a repetition draw. The game continued 35.Rd6 Rbxd7 36.Rxc6 Rd2+ 37.Rxd2 Rxd2+ and we have caught up to the previous post.

Instead of 33.Rb1?, how might White have improved?

Surprisingly, 33.Rde1 seems to be the path to victory. A plausible continuation goes 33...Kf8 34.Re7. White could also transpose and start with 33.Re7 Kf8 34.Rde1. 33.Rde1 allows Black to fall into 34...Rxd7?? 35.Re8+! Rxe8 36.Rxe8 mate. After 34.Re7:

I think this is where imagination helps the master find the right way. In this position, Black is nearly in zugzwang. The black rooks and king are tied to the eighth rank preventing disaster with Re8+. The white king is still trapped on the a-file, but Re1-Re3-Re1 can waste moves while Black can only waste moves with Rb8-a8, allowing the white king to break free and move up the board on a path like Kb3-a4-a5-a6xa7-b6xc5-d6. If Black moves his kingside pawns, the white rooks might gain more loose pawns as targets. Stockfish gives best play as 34...h6 35.gxh6 gxh6 36.R1e5 Kg7 37.Rf5 Rf8 38.Rxc5 Rfd8 39.Rf5 Rf8 40.h4 and evaluates this as about +4.0 winning for White.

So there you have it, a wild, blunderful rook endgame where I was:

  • lost after 32...Rfd8 33.Rde1
  • equal after 33.Rb1? Kf8!
  • winning after 45.Re1?! Re5!
  • equal but almost losing after 45...Rc7?!
  • lost if my opponent played 51.Kd7 and I couldn't find 51...Rh8! 52.c7 Kf5! 53.Re8 Rh7+ 54.Re7 Rh8 55.c8=Q Rxc8 56.Kxc8 a6!!=
  • and equal through my last move 59...Kf6
  • when my opponent resigned in a drawn position
It was a very instructive game that taught me rook endgame lessons such as:
  • No one ever drew a game by resigning.
  • Always keep your rook as active as possible.
  • Time is of the essence, almost all the time.
  • Don't give your opponent easy decisions.
  • Rook endgames are not just tactical; look for positional cutoffs and binds.
  • Two pawns, even if disconnected, can give a rook fits
  • Don't take any exchanges for granted in calculations.

Saturday, May 14, 2016

Practical Rook Endgames 12: Position and Movement

I should go back and watch "The Count of Monte Cristo" because much of it fades from memory. I guess the gist is a grave injustice leading to prolonged imprisonment followed by escape and revenge. My header refers to "The Shawshank Redemption" which includes a line of dialog discussing "The Count." Both Shawshank and Count are about prison breaks. In this phase, the black king finally breaks free of back rank imprisonment.

This post is the fourth installment from a semifinal game from my 2015 club championship run. The game is broken into phases running roughly in reverse chronological order.

For this fourth installment, I'm going 13 moves into the past from the previous post to the moment the game became a single rook versus single rook ending.

In rook endgames, I often think of the rooks as monsters rampaging around and eating up peasants as fast as they can with the possibility that one side will end up with a decisive advantage in pawn quantity. These considerations of capturing speed often deal with how orderly the pawns are and whether it pays in tempi to attack or defend. The game continued along this line with 38.Kb3 Rxf2 39.Rxc5 Rxh2 40.Re5.

Black has gotten the material superiority, but White has several positional advantages: his rook cuts off the black king, his own white king has space to roam, and the c-pawn is the most threatening passer on the board. Incidentally, Stockfish at 30 ply sees a draw ahead. Maintaining activity of the pieces is important with all phases of the game and the ending is no exception. The rooks are weird in that they command as many squares from the edge of the board as from the center and in fact checking distance seems to make them want to lurk at the edge of the board. However, my opponent has utilized a cutoff idea which prevents my king from fighting White's passer. Here I made a decent move designed to disrupt the rook placement, but I missed two other ideas that are crucial to the position.

The first missed idea is that Black might try to sneak the h-pawn past an en passant attack. The distant passer is a strong asset and if the opponent respects it too much, the position could transform into another kind of advantage for Black. 40...h5!?.

Of course, one of the problems with this move is that White's threat of queening the c-pawn is stronger, especially when Black's king has back rank issues right now. Still drawish is 41.c5 Rh1 42.Kc2 Rh4 43.Kc3 Rh1 44.Kc2 and Black can draw by threatening to arrive at c1 or c4. This drawing idea by trying to enter on c1 or c4 is the second idea that would have been helpful to see. But the two ideas are nearly mutually exclusive. If Black got too cocky about the h-pawn, 44...h4? would be a mistake because it would prevent the threat of Rh1-Rh4-Rc4 stopping White's passer. But if White were to make the mistake of 41.gxh6 then Black does well to recapture 41...Rxh6, with plans to transfer both king and rook to fight the c-pawn and if White's threats can be neutralized there, the f-g connected passers will be very strong eventually. One of the advantages of h5 is that if White tries to oppose rooks, Black probably has a winning pawn endgame. Instead, I opted for a move that escapes back rank imprisonment and also gains a tempo on White's centralized rook. 40...f6 41.gxf6 gxf6.

Here I expected White to go back into pawn eating mode with Ra5, but he preferred the positional 42.Re1. The c-pawn in the hand is worth more than material parity. One thing to note about White's move is that Black can no longer play Rh1 and therefore the harassment of the c-pawn is now limited to squares c5-c8. Black's rooks needs more activity, so 42...Rh5 is a decent move.

White now played 43.Re6. Since he could have played this move last turn, I consider the excursion with Re1 a waste of time. However, I let down my guard at this point and contented myself with a passive placement of my rook. 43...Rc5

And I offered a draw. I expected White to play 44.Rxf6+ reestablishing material parity and allowing my king some breathing room. Both sides could nurse their passers. Mine would be more distant. But White declined with 44.Kb4 so I continued with 44...Kf7

Both sides now have rooks en prise. Since it's White's move, I can lose the f6 pawn and we'll then have a pure pawn ending with two pawns on each side. However, Black will have the advantage of the distant passer. The black king can step in front of the c-pawn rather easily, but it's not so easy for the white king to step in front of the h-pawn. Black will then be able to get to the a-pawns quicker and the head start might be decisive. So the offer of a trade is actually a tactical trap. Indeed, the actual line if White chooses to win a pawn leads to a win for Black. e.g. 45.Rxf6+?? Kxf6 46.Kxc5 Ke6 47.Kc6 h5! White will find it necessary to post his king on b7 in order to queen. That means that the h-pawn queens with check and then the black queen and king can make sure c7-c8=Q never works. Now 45.Ra6 ensures a drawish position. Instead my opponent plays an inferior move that sets up his own trap. 45.Re1?!

The idea White is playing for is to maintain the cut off of the black king so that the black rook has to fight the c-pawn by itself. However, Black can refute this plan and grab the advantage by playing 45...Re5!

White will have to content himself with a worse ending. e.g. 46.Rxe5?? fxe5 and the distant passer wins for Black. 46.Rb1 a5+ 47.Ka4 h5 and Black has no trouble pressing his advantage. Unfortunately, I was still in consolidation mode and only had eyes for Rc7 defending my scattered pawns. Unfortunately, the defender needs defending too. It could have been strongly posted at e5, but instead it is passively placed at c7 and vulnerable to attack. So the actual game continued 45...Rc7?

Of note, Stockfish still thinks this is a draw. White pressed on with 46.c5 f5 47.Kb5 h5 48.c6 Kf6 49.Kc5 f4 50.Kd6 which brings us to the previous post.